注意:画像の表示方法が分からないという方は、まず「コントロールやフォームに画像を表示する」をご覧ください。また、文字列を描画させる方法は、「文字を書く」をご覧ください。
文字列をGraphics.DrawStringメソッドで描画するとき、StringFormatオブジェクトのTrimmingプロパティを変更することにより、指定された範囲に文字列が表示しきれないとき省略記号(...)が表示させるようにできます。
TrimmingプロパティにEllipsisCharacter、EllipsisWord、EllipsisPathを指定することにより、省略記号が表示されるようになります。EllipsisCharacterとEllipsisWordでは末尾に、EllipsisPathでは真ん中に省略記号が入ります。またEllipsisCharacterは文字単位で、EllipsisWordは単語単位で省略されます。
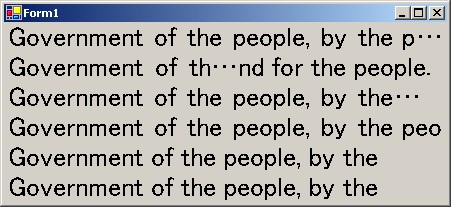
下のコードでは、Trimmingプロパティにさまざまな値を指定した時にどのように表示されるか試すものです。結果は上の画像のようになり、上から、EllipsisCharacter、EllipsisPath、EllipsisWord、Character、Word、Noneです。この例ではフォームにPictureBoxコントロール"PictureBox1"があるものとします。
'Imports System.Drawing

'表示させる文字列
Dim s As String = "Government of the people, by the people," + _
    "and for the people."

'描画先とするImageオブジェクトを作成する
Dim canvas As New Bitmap(PictureBox1.Width, PictureBox1.Height)
'ImageオブジェクトのGraphicsオブジェクトを作成する
Dim g As Graphics = Graphics.FromImage(canvas)

'フォントオブジェクトの作成
Dim fnt As New Font("MS UI Gothic", 20)

'StringFormatオブジェクトの作成
Dim sf As New StringFormat

'EllipsisCharacterで文字列を表示
sf.Trimming = StringTrimming.EllipsisCharacter
g.DrawString(s, fnt, Brushes.Black, New RectangleF(0, 0, 450, 30), sf)

'EllipsisPathで文字列を表示
sf.Trimming = StringTrimming.EllipsisPath
g.DrawString(s, fnt, Brushes.Black, New RectangleF(0, 30, 450, 30), sf)

'EllipsisWordで文字列を表示
sf.Trimming = StringTrimming.EllipsisWord
g.DrawString(s, fnt, Brushes.Black, New RectangleF(0, 60, 450, 30), sf)

'Characterで文字列を表示
sf.Trimming = StringTrimming.Character
g.DrawString(s, fnt, Brushes.Black, New RectangleF(0, 90, 450, 30), sf)

'Wordで文字列を表示
sf.Trimming = StringTrimming.Word
g.DrawString(s, fnt, Brushes.Black, New RectangleF(0, 120, 450, 30), sf)

'Noneで文字列を表示
sf.Trimming = StringTrimming.None
g.DrawString(s, fnt, Brushes.Black, New RectangleF(0, 150, 450, 30), sf)

'リソースを解放する
fnt.Dispose()
sf.Dispose()
g.Dispose()

'PictureBox1に表示する
PictureBox1.Image = canvas
//using System.Drawing;

//表示させる文字列
string s = "Government of the people, by the people,"
    + "and for the people.";

//描画先とするImageオブジェクトを作成する
Bitmap canvas = new Bitmap(PictureBox1.Width, PictureBox1.Height);
//ImageオブジェクトのGraphicsオブジェクトを作成する
Graphics g = Graphics.FromImage(canvas);

//フォントオブジェクトの作成
Font fnt = new Font("MS UI Gothic", 20);

//StringFormatオブジェクトの作成
StringFormat sf = new StringFormat();

//EllipsisCharacterで文字列を表示
sf.Trimming = StringTrimming.EllipsisCharacter;
g.DrawString(s, fnt, Brushes.Black, new RectangleF(0, 0, 450, 30), sf);

//EllipsisPathで文字列を表示
sf.Trimming = StringTrimming.EllipsisPath;
g.DrawString(s, fnt, Brushes.Black, new RectangleF(0, 30, 450, 30), sf);

//EllipsisWordで文字列を表示
sf.Trimming = StringTrimming.EllipsisWord;
g.DrawString(s, fnt, Brushes.Black, new RectangleF(0, 60, 450, 30), sf);

//Characterで文字列を表示
sf.Trimming = StringTrimming.Character;
g.DrawString(s, fnt, Brushes.Black, new RectangleF(0, 90, 450, 30), sf);

//Wordで文字列を表示
sf.Trimming = StringTrimming.Word;
g.DrawString(s, fnt, Brushes.Black, new RectangleF(0, 120, 450, 30), sf);

//Noneで文字列を表示
sf.Trimming = StringTrimming.None;
g.DrawString(s, fnt, Brushes.Black, new RectangleF(0, 150, 450, 30), sf);

//リソースを解放する
fnt.Dispose();
sf.Dispose();
g.Dispose();

//PictureBox1に表示する
PictureBox1.Image = canvas;
.NET Framework 2.0から追加されたTextRenderer.DrawTextメソッドで文字列を描画する場合は、TextFormatFlagsにEndEllipsisやPathEllipsisを指定します。
以下にこれらを使用して文字列を描画した例を示します。
'Imports System.Windows.Forms
'Imports System.Drawing

Dim s As String = "C:\Documents and Settings\user\My Documents\" + _
    "Visual Studio 2005\Projects\WindowsApp\WindowsApp\Form1.cs"

'描画先とするImageオブジェクトを作成する
Dim canvas As New Bitmap(PictureBox1.Width, PictureBox1.Height)
'ImageオブジェクトのGraphicsオブジェクトを作成する
Dim g As Graphics = Graphics.FromImage(canvas)

'フォントオブジェクトの作成
Dim fnt As New Font("MS UI Gothic", 20)

'トリムされる行の末尾を削除し、省略記号に置き換える
System.Windows.Forms.TextRenderer.DrawText( _
    g, s, fnt, New Rectangle(0, 0, 450, 30), Color.Black, _
    TextFormatFlags.EndEllipsis)

'トリムされる行の中央を削除し、省略記号に置き換える
System.Windows.Forms.TextRenderer.DrawText( _
    g, s, fnt, New Rectangle(0, 30, 450, 30), Color.Black, _
    TextFormatFlags.PathEllipsis)

'行を最も近い単語までトリムし、末尾に省略記号を配置する
System.Windows.Forms.TextRenderer.DrawText( _
    g, s, fnt, New Rectangle(0, 60, 450, 30), Color.Black, _
    TextFormatFlags.WordEllipsis)

'リソースを解放する
fnt.Dispose()
g.Dispose()

'PictureBox1に表示する
PictureBox1.Image = canvas
//using System.Windows.Forms;
//using System.Drawing;

string s = @"C:\Documents and Settings\user\My Documents\" +
    @"Visual Studio 2005\Projects\WindowsApp\WindowsApp\Form1.cs";

//描画先とするImageオブジェクトを作成する
Bitmap canvas = new Bitmap(PictureBox1.Width, PictureBox1.Height);
//ImageオブジェクトのGraphicsオブジェクトを作成する
Graphics g = Graphics.FromImage(canvas);

//フォントオブジェクトの作成
Font fnt = new Font("MS UI Gothic", 20);

//トリムされる行の末尾を削除し、省略記号に置き換える
System.Windows.Forms.TextRenderer.DrawText(
    g, s, fnt, new Rectangle(0, 0, 450, 30), Color.Black,
    TextFormatFlags.EndEllipsis);

//トリムされる行の中央を削除し、省略記号に置き換える
System.Windows.Forms.TextRenderer.DrawText(
    g, s, fnt, new Rectangle(0, 30, 450, 30), Color.Black,
    TextFormatFlags.PathEllipsis);

//行を最も近い単語までトリムし、末尾に省略記号を配置する
System.Windows.Forms.TextRenderer.DrawText(
    g, s, fnt, new Rectangle(0, 60, 450, 30), Color.Black,
    TextFormatFlags.WordEllipsis);

//リソースを解放する
fnt.Dispose();
g.Dispose();

//PictureBox1に表示する
PictureBox1.Image = canvas;
結果は、次のようになります。
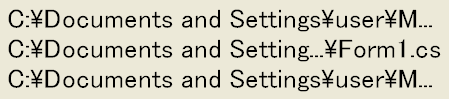
補足:TextFormatFlags.PathEllipsisを使用したとき、先の「Government of the people,...」のような普通の文字列を描画したのでは、トリムされません。上の例のようなファイルのパスでは、うまくいきます。
注意:この記事では、基本的な事柄の説明が省略されているかもしれません。初心者の方は、特に以下の点にご注意ください。