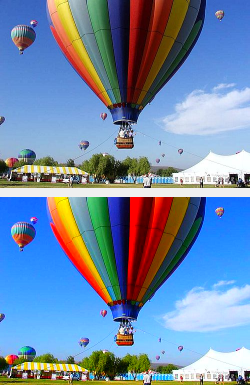
画像の彩度を変更する方法は色々あると思いますが、ここでは「Matrix Operations for Image Processing」で紹介されている方法でやってみます。
以下の例では、PictureBoxコントロール(PictureBox1)をクリックすると、画像(C:\test\1.png)の彩度を変更してPictureBox1に表示されるようにしています。
'Imports System.Drawing

''' <summary>
''' 指定した画像の彩度を変更した画像を作成する
''' </summary>
''' <param name="img">基になる画像</param>
''' <param name="saturation">彩度</param>
''' <returns>作成された画像</returns>
Public Shared Function ChangeSaturation(ByVal img As Image, _
        ByVal saturation As Single) As Image
    '彩度を変更した画像の描画先となるImageオブジェクトを作成
    Dim newImg As New Bitmap(img.Width, img.Height)
    'newImgのGraphicsオブジェクトを取得
    Dim g As Graphics = Graphics.FromImage(newImg)

    'ColorMatrixオブジェクトの作成
    Dim cm As New System.Drawing.Imaging.ColorMatrix()
    Const rwgt As Single = 0.3086F
    Const gwgt As Single = 0.6094F
    Const bwgt As Single = 0.082F
    cm.Matrix01 = (1.0F - saturation) * rwgt
    cm.Matrix02 = cm.Matrix01
    cm.Matrix00 = cm.Matrix01 + saturation
    cm.Matrix10 = (1.0F - saturation) * gwgt
    cm.Matrix12 = cm.Matrix10
    cm.Matrix11 = cm.Matrix10 + saturation
    cm.Matrix20 = (1.0F - saturation) * bwgt
    cm.Matrix21 = cm.Matrix20
    cm.Matrix22 = cm.Matrix20 + saturation
    cm.Matrix33 = 1
    cm.Matrix44 = 1

    'ImageAttributesオブジェクトの作成
    Dim ia As New System.Drawing.Imaging.ImageAttributes()
    'ColorMatrixを設定する
    ia.SetColorMatrix(cm)

    'ImageAttributesを使用して描画
    g.DrawImage(img, New Rectangle(0, 0, img.Width, img.Height), _
                0, 0, img.Width, img.Height, GraphicsUnit.Pixel, ia)

    'リソースを解放する
    g.Dispose()

    Return newImg
End Function

'PictureBox1のClickイベントハンドラ
Private Sub PictureBox1_Click(ByVal sender As Object, ByVal e As EventArgs) _
        Handles PictureBox1.Click
    '彩度を変更する画像
    Dim img As New Bitmap("C:\test\1.png")
    '彩度を変更した画像を作成する
    Dim newImg As Image = ChangeSaturation(img, 2)
    img.Dispose()
    'PictureBox1に表示
    If Not PictureBox1.Image Is Nothing Then
        PictureBox1.Image.Dispose()
    End If
    PictureBox1.Image = newImg
End Sub
//using System.Drawing;

/// <summary>
/// 指定した画像の彩度を変更した画像を作成する
/// </summary>
/// <param name="img">基になる画像</param>
/// <param name="saturation">彩度</param>
/// <returns>作成された画像</returns>
public static Image ChangeSaturation(Image img, float saturation)
{
    //彩度を変更した画像の描画先となるImageオブジェクトを作成
    Bitmap newImg = new Bitmap(img.Width, img.Height);
    //newImgのGraphicsオブジェクトを取得
    Graphics g = Graphics.FromImage(newImg);

    //ColorMatrixオブジェクトの作成
    System.Drawing.Imaging.ColorMatrix cm =
        new System.Drawing.Imaging.ColorMatrix();
    const float rwgt = 0.3086f;
    const float gwgt = 0.6094f;
    const float bwgt = 0.0820f;
    cm.Matrix01 = cm.Matrix02 = (1f - saturation) * rwgt;
    cm.Matrix00 = cm.Matrix01 + saturation;
    cm.Matrix10 = cm.Matrix12 = (1f - saturation) * gwgt;
    cm.Matrix11 = cm.Matrix10 + saturation;
    cm.Matrix20 = cm.Matrix21 = (1f - saturation) * bwgt;
    cm.Matrix22 = cm.Matrix20 + saturation;
    cm.Matrix33 = cm.Matrix44 = 1;

    //ImageAttributesオブジェクトの作成
    System.Drawing.Imaging.ImageAttributes ia =
        new System.Drawing.Imaging.ImageAttributes();
    //ColorMatrixを設定する
    ia.SetColorMatrix(cm);

    //ImageAttributesを使用して描画
    g.DrawImage(img,
        new Rectangle(0, 0, img.Width, img.Height),
        0, 0, img.Width, img.Height, GraphicsUnit.Pixel, ia);

    //リソースを解放する
    g.Dispose();

    return newImg;
}

//PictureBox1のClickイベントハンドラ
private void PictureBox1_Click(object sender, EventArgs e)
{
    //彩度を変更する画像
    Bitmap img = new Bitmap(@"C:\test\1.png");
    //彩度を変更した画像を作成する
    Image newImg = ChangeSaturation(img, 2);
    img.Dispose();
    //PictureBox1に表示
    if (PictureBox1.Image != null)
    {
        PictureBox1.Image.Dispose();
    }
    PictureBox1.Image = newImg;
}
結果は、次のようになります。上の画像が元の画像で、下の画像が彩度を変更した画像です。

注意:この記事では、基本的な事柄の説明が省略されているかもしれません。初心者の方は、特に以下の点にご注意ください。