注意:画像の表示方法が分からないという方は、まず「コントロールやフォームに画像を表示する」をご覧ください。また、ブラシについては、「塗りつぶした図形を描く」をご覧ください。
文字を描画するには、Graphics.DrawStringメソッドを用います。この時、使用するフォントとブラシ(何色で表示するか)と表示位置を最低指定する必要があります。
簡単な例として、ピクチャボックス「PictureBox1」にフォント「MS UI Gothic」、大きさ20ポイントで青色の文字を描画するコードを示します。
'Imports System.Drawing
'Imports System.Windows.Forms

'描画先とするImageオブジェクトを作成する
Dim canvas As New Bitmap(PictureBox1.Width, PictureBox1.Height)
'ImageオブジェクトのGraphicsオブジェクトを作成する
Dim g As Graphics = Graphics.FromImage(canvas)

'フォントオブジェクトの作成
Dim fnt As New Font("MS UI Gothic", 20)
'文字列を位置(0,0)、青色で表示
g.DrawString("これはテストです。", fnt, Brushes.Blue, 0, 0)

'リソースを解放する
fnt.Dispose()
g.Dispose()

'PictureBox1に表示する
PictureBox1.Image = canvas
//using System.Drawing;
//using System.Windows.Forms;

//描画先とするImageオブジェクトを作成する
Bitmap canvas = new Bitmap(PictureBox1.Width, PictureBox1.Height);
//ImageオブジェクトのGraphicsオブジェクトを作成する
Graphics g = Graphics.FromImage(canvas);

//フォントオブジェクトの作成
Font fnt = new Font("MS UI Gothic", 20);
//文字列を位置(0,0)、青色で表示
g.DrawString("これはテストです。", fnt, Brushes.Blue, 0, 0);

//リソースを解放する
fnt.Dispose();
g.Dispose();

//PictureBox1に表示する
PictureBox1.Image = canvas;
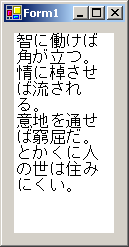
次のようにRectangle構造体を指定すると、その内部に文字列が納まるように自動的に折り返されます。
'Imports System.Drawing
'Imports System.Windows.Forms

'描画先とするImageオブジェクトを作成する
Dim canvas As New Bitmap(PictureBox1.Width, PictureBox1.Height)
'ImageオブジェクトのGraphicsオブジェクトを作成する
Dim g As Graphics = Graphics.FromImage(canvas)

Dim drawString As String = "智に働けば角が立つ。情に棹させば流される。" _
 + vbCrLf + "意地を通せば窮屈だ。とかくに人の世は住みにくい。"
'Fontを作成
Dim fnt As New Font("MS ゴシック", 12)
'文字列を表示する範囲を指定する
Dim rect As New RectangleF(10, 10, 100, 200)
'rectの四角を描く
g.FillRectangle(Brushes.White, rect)
'文字を書く
g.DrawString(drawString, fnt, Brushes.Black, rect)

'リソースを解放する
fnt.Dispose()
g.Dispose()

'PictureBox1に表示する
PictureBox1.Image = canvas
//using System.Drawing;
//using System.Windows.Forms;

//描画先とするImageオブジェクトを作成する
Bitmap canvas = new Bitmap(PictureBox1.Width, PictureBox1.Height);
//ImageオブジェクトのGraphicsオブジェクトを作成する
Graphics g = Graphics.FromImage(canvas);

string  drawString= @"智に働けば角が立つ。情に棹させば流される。
意地を通せば窮屈だ。とかくに人の世は住みにくい。";
//Fontを作成
Font fnt = new Font("MS ゴシック", 12);
//文字列を表示する範囲を指定する
RectangleF rect = new RectangleF(10, 10, 100, 200);
//rectの四角を描く
g.FillRectangle(Brushes.White, rect);
//文字を書く
g.DrawString(drawString, fnt, Brushes.Black, rect);

//リソースを解放する
fnt.Dispose();
g.Dispose();

//PictureBox1に表示する
PictureBox1.Image = canvas;

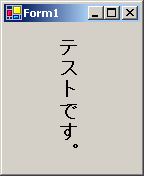
次のサンプルではStringFormat.FormatFlagsプロパティにStringFormatFlags.DirectionVerticalを指定したStringFormatオブジェクトを使用して、文字を縦書きで書いています。フォントは縦書き用のものを使います。
'Imports System.Drawing
'Imports System.Windows.Forms

'描画先とするImageオブジェクトを作成する
Dim canvas As New Bitmap(PictureBox1.Width, PictureBox1.Height)
'ImageオブジェクトのGraphicsオブジェクトを作成する
Dim g As Graphics = Graphics.FromImage(canvas)

Dim drawString As String = "テストです。"
'Fontオブジェクトの作成(太字にする)
Dim fnt As New Font("@MS ゴシック", 16, FontStyle.Bold)
'StringFormatを作成
Dim sf As New StringFormat()
'縦書きにする
sf.FormatFlags = StringFormatFlags.DirectionVertical
'文字を表示
g.DrawString(drawString, fnt, Brushes.Black, 150F, 50F, sf)

'リソースを解放する
sf.Dispose()
fnt.Dispose()
g.Dispose()

'PictureBox1に表示する
PictureBox1.Image = canvas
//using System.Drawing;
//using System.Windows.Forms;

//描画先とするImageオブジェクトを作成する
Bitmap canvas = new Bitmap(PictureBox1.Width, PictureBox1.Height);
//ImageオブジェクトのGraphicsオブジェクトを作成する
Graphics g = Graphics.FromImage(canvas);

string  drawString= "テストです。";
//Fontオブジェクトの作成(太字にする)
Font fnt = new Font("@MS ゴシック", 16, FontStyle.Bold);
//StringFormatを作成
StringFormat sf = new StringFormat();
//縦書きにする
sf.FormatFlags = StringFormatFlags.DirectionVertical;
//文字を表示
g.DrawString(drawString, fnt, Brushes.Black,
    150.0F, 50.0F, sf);

//リソースを解放する
sf.Dispose();
fnt.Dispose();
g.Dispose();

//PictureBox1に表示する
PictureBox1.Image = canvas;

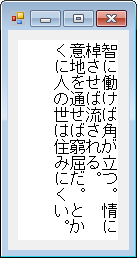
上記の方法で縦書きにすると、そのままでは左から右に文章が表示されます。右から左に表示されるようにするには、StringFormatのFormatFlagsにDirectionRightToLeftを追加します。
'Imports System.Drawing
'Imports System.Windows.Forms

'描画先とするImageオブジェクトを作成する
Dim canvas As New Bitmap(PictureBox1.Width, PictureBox1.Height)
'ImageオブジェクトのGraphicsオブジェクトを作成する
Dim g As Graphics = Graphics.FromImage(canvas)

Dim drawString As String = "智に働けば角が立つ。情に棹させば流される。" _
    + vbCrLf + "意地を通せば窮屈だ。とかくに人の世は住みにくい。"
Dim fnt As New Font("@MS ゴシック", 12)
Dim rect As New RectangleF(10, 10, 100, 200)
g.FillRectangle(Brushes.White, rect)

'StringFormatを作成
Dim sf As New StringFormat()
'縦書きにして、右から左に表示する
sf.FormatFlags = StringFormatFlags.DirectionVertical Or _
    StringFormatFlags.DirectionRightToLeft

g.DrawString(drawString, fnt, Brushes.Black, rect, sf)

sf.Dispose()
fnt.Dispose()
g.Dispose()

'PictureBox1に表示する
PictureBox1.Image = canvas
//using System.Drawing;
//using System.Windows.Forms;

//描画先とするImageオブジェクトを作成する
Bitmap canvas = new Bitmap(PictureBox1.Width, PictureBox1.Height);
//ImageオブジェクトのGraphicsオブジェクトを作成する
Graphics g = Graphics.FromImage(canvas);

string drawString = @"智に働けば角が立つ。情に棹させば流される。
意地を通せば窮屈だ。とかくに人の世は住みにくい。";
Font fnt = new Font("@MS ゴシック", 12);
RectangleF rect = new RectangleF(10, 10, 100, 200);
g.FillRectangle(Brushes.White, rect);

//StringFormatを作成
StringFormat sf = new StringFormat();
//縦書きにして、右から左に表示する
sf.FormatFlags = StringFormatFlags.DirectionVertical |
    StringFormatFlags.DirectionRightToLeft;

g.DrawString(drawString, fnt, Brushes.Black, rect, sf);

sf.Dispose();
fnt.Dispose();
g.Dispose();

//PictureBox1に表示する
PictureBox1.Image = canvas;

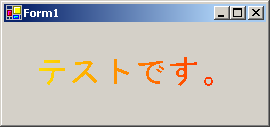
つぎはブラシを使って文字にグラデーションをかける例です。またStringFormatを指定することにより、文字を真ん中に表示するようにしています。グラデーションのブラシに関しては「グラデーションをかける」を参考にしてください。
'Imports System.Drawing
'Imports System.Drawing.Drawing2D
'がソースファイルの一番上に書かれているものとする

'描画先とするImageオブジェクトを作成する
Dim canvas As New Bitmap(PictureBox1.Width, PictureBox1.Height)
'ImageオブジェクトのGraphicsオブジェクトを作成する
Dim g As Graphics = Graphics.FromImage(canvas)

Dim drawString As String = "テストです。"
'Fontを作成
Dim fnt As New Font("MS ゴシック", 24)
'線形グラデーション(横に黄色から赤)を作成
Dim b As New LinearGradientBrush(PictureBox1.ClientRectangle, _
 Color.Yellow, Color.Red, LinearGradientMode.Horizontal)
'StringFormatを作成
Dim sf As New StringFormat
'文字を真ん中に表示
sf.Alignment = StringAlignment.Center
sf.LineAlignment = StringAlignment.Center
'文字を書く
g.DrawString(drawString, fnt, b, _
    RectangleF.op_Implicit(PictureBox1.ClientRectangle), sf)


'リソースを解放する
fnt.Dispose()
b.Dispose()
g.Dispose()

'PictureBox1に表示する
PictureBox1.Image = canvas
//using System.Drawing;
//using System.Drawing.Drawing2D;
//がソースファイルの一番上に書かれているものとする

//描画先とするImageオブジェクトを作成する
Bitmap canvas = new Bitmap(PictureBox1.Width, PictureBox1.Height);
//ImageオブジェクトのGraphicsオブジェクトを作成する
Graphics g = Graphics.FromImage(canvas);

string  drawString= "テストです。";
//Fontを作成
Font fnt = new Font("MS ゴシック", 24);
//線形グラデーション(横に黄色から赤)を作成
LinearGradientBrush b = new LinearGradientBrush(
                            PictureBox1.ClientRectangle,
                            Color.Yellow,
                            Color.Red,
                            LinearGradientMode.Horizontal);
//StringFormatを作成
StringFormat sf = new StringFormat();
//文字を真ん中に表示
sf.Alignment = StringAlignment.Center;
sf.LineAlignment = StringAlignment.Center;
//文字を書く
g.DrawString(drawString, fnt, b,
    PictureBox1.ClientRectangle, sf);

//リソースを解放する
fnt.Dispose();
b.Dispose();
g.Dispose();

//PictureBox1に表示する
PictureBox1.Image = canvas;

.NET Framework 2.0からはTextRendererクラスが追加され、このDrawTextメソッドにより文字列を描画することもできるようになりました。
Graphics.DrawStringメソッドとの違いは、Graphics.DrawStringメソッドがGDI+を使ってテキスト描画しているのに対して、TextRenderer.DrawTextメソッドはGDIを使用している点です。.NET Framework 2.0以降では、通常コントロールのテキストはTextRenderer.DrawTextメソッドでレンダリングされます。詳しくは、「.NET Framework 2.0以降でも1.1と同じGDI+でコントロールの文字列を描画する」をご覧ください。
TextRenderer.DrawTextメソッドは、印刷で使用することはできません。また、色の指定にColor型を使用しているため、ブラシを使って描画することはできません。
さらに、描画する文字列の中にある&はアンダーラインとして描画されます。&のまま描画する方法は、「TextRenderer.DrawTextメソッドを使用して描画する場合」で紹介しています。
以下にTextRenderer.DrawTextメソッドを使って文字列を描画する例を示します。この記事の一番初めに紹介したコードをTextRenderer.DrawTextメソッドを使って書き換えました。
'Imports System.Drawing
'Imports System.Windows.Forms

Dim canvas As New Bitmap(PictureBox1.Width, PictureBox1.Height)
'ImageオブジェクトのGraphicsオブジェクトを作成する
Dim g As Graphics = Graphics.FromImage(canvas)

'フォントオブジェクトの作成
Dim fnt As New Font("MS UI Gothic", 20)
'文字列を位置(0,0)、青色で表示
System.Windows.Forms.TextRenderer.DrawText( _
    g, "これはテストです。", fnt, New Point(0, 0), Color.Blue)

'リソースを解放する
fnt.Dispose()
g.Dispose()

'PictureBox1に表示する
PictureBox1.Image = canvas
//using System.Drawing;
//using System.Windows.Forms;

//描画先とするImageオブジェクトを作成する
Bitmap canvas = new Bitmap(PictureBox1.Width, PictureBox1.Height);
//ImageオブジェクトのGraphicsオブジェクトを作成する
Graphics g = Graphics.FromImage(canvas);

//フォントオブジェクトの作成
Font fnt = new Font("MS UI Gothic", 20);
//文字列を位置(0,0)、青色で表示
System.Windows.Forms.TextRenderer.DrawText(
    g, "これはテストです。", fnt, new Point(0, 0), Color.Blue);

//リソースを解放する
fnt.Dispose();
g.Dispose();

//PictureBox1に表示する
PictureBox1.Image = canvas;
Graphics.DrawStringと比べてどのように表示されるか比較してみました。下図の上がGraphics.DrawStringで、下がTextRenderer.DrawTextです。

文字列を"wwwwwwwwww"にして描画すると、次のようになります。やはり上がGraphics.DrawStringで、下がTextRenderer.DrawTextです。
