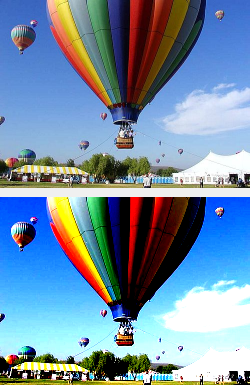
画像のコントラストを調節するアルゴリズムは色々あるようですが、ここでは「Image Processing for Dummies with C# and GDI+ Part 1 - Per Pixel Filters - CodeProject」で紹介されている方法を使ってみます。参考にした記事では新しい色をピクセル毎に計算していますが、ここではColorMatrixクラスを使って変換することにします。なおColorMatrixクラスについて詳しくは、「画像のカラーバランスを補正して表示する」をご覧ください。
'Imports System.Drawing

''' <summary>
''' 指定した画像のコントラストを変更して新しい画像を作成する
''' </summary>
''' <param name="img">基になる画像</param>
''' <param name="contrast">コントラストの値(-100~100)</param>
''' <returns>作成された画像</returns>
Public Shared Function AdjustContrast(ByVal img As Image, _
        ByVal contrast As Single) As Image
    'コントラストを変更した画像の描画先となるImageオブジェクトを作成
    Dim newImg As New Bitmap(img.Width, img.Height)
    'newImgのGraphicsオブジェクトを取得
    Dim g As Graphics = Graphics.FromImage(newImg)

    'ColorMatrixオブジェクトの作成
    Dim scale As Single = (100.0F + contrast) / 100.0F
    scale *= scale
    Dim append As Single = 0.5F * (1.0F - scale)
    Dim cm As New System.Drawing.Imaging.ColorMatrix(New Single()() _
        {New Single() {scale, 0, 0, 0, 0}, _
         New Single() {0, scale, 0, 0, 0}, _
         New Single() {0, 0, scale, 0, 0}, _
         New Single() {0, 0, 0, 1, 0}, _
         New Single() {append, append, append, 0, 1}})

    'ImageAttributesオブジェクトの作成
    Dim ia As New System.Drawing.Imaging.ImageAttributes()
    'ColorMatrixを設定する
    ia.SetColorMatrix(cm)

    'ImageAttributesを使用して描画
    g.DrawImage(img, New Rectangle(0, 0, img.Width, img.Height), _
                0, 0, img.Width, img.Height, GraphicsUnit.Pixel, ia)

    'リソースを解放する
    g.Dispose()

    Return newImg
End Function

'PictureBox1のClickイベントハンドラ
Private Sub PictureBox1_Click(ByVal sender As Object, ByVal e As EventArgs) _
        Handles PictureBox1.Click
    'コントラストを変更する画像
    Dim img As New Bitmap("C:\test\1.png")
    'コントラストを50にした画像を作成する
    Dim newImg As Image = AdjustContrast(img, 50)
    img.Dispose()
    'PictureBox1に表示
    If Not PictureBox1.Image Is Nothing Then
        PictureBox1.Image.Dispose()
    End If
    PictureBox1.Image = newImg
End Sub
//using System.Drawing;

/// <summary>
/// 指定した画像のコントラストを変更して新しい画像を作成する
/// </summary>
/// <param name="img">基になる画像</param>
/// <param name="contrast">コントラストの値(-100~100)</param>
/// <returns>作成された画像</returns>
public static Image AdjustContrast(Image img, float contrast)
{
    //コントラストを変更した画像の描画先となるImageオブジェクトを作成
    Bitmap newImg = new Bitmap(img.Width, img.Height);
    //newImgのGraphicsオブジェクトを取得
    Graphics g = Graphics.FromImage(newImg);

    //ColorMatrixオブジェクトの作成
    float scale = (100f + contrast) / 100f;
    scale *= scale;
    float append = 0.5f * (1f - scale);
    System.Drawing.Imaging.ColorMatrix cm =
        new System.Drawing.Imaging.ColorMatrix(
            new float[][] {
        new float[] {scale, 0, 0, 0, 0},
        new float[] {0, scale, 0, 0, 0},
        new float[] {0, 0, scale, 0, 0},
        new float[] {0, 0, 0, 1, 0},
        new float[] {append, append, append, 0, 1}
    });

    //ImageAttributesオブジェクトの作成
    System.Drawing.Imaging.ImageAttributes ia =
        new System.Drawing.Imaging.ImageAttributes();
    //ColorMatrixを設定する
    ia.SetColorMatrix(cm);

    //ImageAttributesを使用して描画
    g.DrawImage(img,
        new Rectangle(0, 0, img.Width, img.Height),
        0, 0, img.Width, img.Height, GraphicsUnit.Pixel, ia);

    //リソースを解放する
    g.Dispose();

    return newImg;
}

//PictureBox1のClickイベントハンドラ
private void PictureBox1_Click(object sender, EventArgs e)
{
    //コントラストを変更する画像
    Bitmap img = new Bitmap(@"C:\test\1.png");
    //コントラストを50にした画像を作成する
    Image newImg = AdjustContrast(img, 50);
    img.Dispose();
    //PictureBox1に表示
    if (PictureBox1.Image != null)
    {
        PictureBox1.Image.Dispose();
    }
    PictureBox1.Image = newImg;
}
結果は、以下のようになります。上が元の画像で、下がAdjustContrastメソッドのcontrast引数を50にして作成した画像です。

注意:この記事では、基本的な事柄の説明が省略されているかもしれません。初心者の方は、特に以下の点にご注意ください。