注意:DataGridViewコントロールは、.NET Framework 2.0で新しく追加されました。
こちらではCellPaintingイベントを使用してDataGridViewのセルを自分で描画する方法を紹介しました。ここで紹介する行を描画する方法は、隣り合うセルをまたいで文字列や背景を行全体に描画したいというケースで役に立ちます。
行を描画するには、DataGridView.RowPrePaintやRowPostPaintイベントを使用します。RowPrePaintイベントは行が描画される前に発生し、RowPostPaintイベントは行が描画された後に発生します。
これらのイベントハンドラの使い分けとしては、RowPostPaintは、行が普通通りに描画された後に前景に何かを付け加えるために使用し、RowPrePaintは、行の背景を描画するために使用するというのが基本となるでしょう。
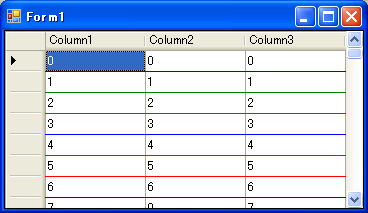
まずは、RowPostPaintイベントハンドラで描画する例を示します。以下の例では、行の下(ヘッダー以外のセルの部分)に線を引いています。

'RowPostPaintイベントハンドラ
Private Sub DataGridView1_RowPostPaint(ByVal sender As Object, _
        ByVal e As DataGridViewRowPostPaintEventArgs) _
        Handles DataGridView1.RowPostPaint
    Dim dgv As DataGridView = CType(sender, DataGridView)

    '線の色を決定する
    Dim linePen As Pen
    Select Case e.RowIndex Mod 3
        Case 0
            linePen = Pens.Blue
        Case 1
            linePen = Pens.Green
        Case Else
            linePen = Pens.Red
    End Select

    '線を引く位置を計算する
    Dim startX As Integer = IIf(dgv.RowHeadersVisible, dgv.RowHeadersWidth, 0)
    Dim startY As Integer = e.RowBounds.Top + e.RowBounds.Height - 1
    Dim endX As Integer = startX + _
        dgv.Columns.GetColumnsWidth(DataGridViewElementStates.Visible) - _
        dgv.HorizontalScrollingOffset

    '線を引く
    e.Graphics.DrawLine(linePen, startX, startY, endX, startY)
End Sub
//RowPostPaintイベントハンドラ
private void DataGridView1_RowPostPaint(object sender,
    DataGridViewRowPostPaintEventArgs e)
{
    DataGridView dgv = (DataGridView)sender;

    //線の色を決定する
    Pen linePen;
    switch (e.RowIndex % 3)
    {
        case 0:
            linePen = Pens.Blue;
            break;
        case 1:
            linePen = Pens.Green;
            break;
        default:
            linePen = Pens.Red;
            break;
    }

    //線を引く位置を計算する
    int startX = dgv.RowHeadersVisible ? dgv.RowHeadersWidth : 0;
    int startY = e.RowBounds.Top + e.RowBounds.Height - 1;
    int endX = startX + dgv.Columns.GetColumnsWidth(
        DataGridViewElementStates.Visible) -
        dgv.HorizontalScrollingOffset;
    //線を引く
    e.Graphics.DrawLine(linePen,
        startX, startY, endX, startY);
}
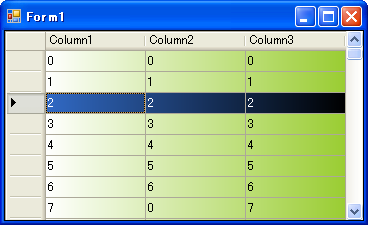
次にRowPrePaintイベントハンドラで行の背景を描画する方法を紹介します。以下に、行全体の背景にグラデーションをかける例を示します。

'RowPrePaintイベントハンドラ
Private Sub DataGridView1_RowPrePaint(ByVal sender As Object, _
        ByVal e As DataGridViewRowPrePaintEventArgs) _
        Handles DataGridView1.RowPrePaint
    '背景を描画するか
    If (e.PaintParts And DataGridViewPaintParts.Background) = _
            DataGridViewPaintParts.Background Then
        '選択されているか調べ、色を決定する
        'bColor1が開始色、bColor2が終了色
        Dim bColor1, bColor2 As Color
        If (e.PaintParts And DataGridViewPaintParts.SelectionBackground) = _
                DataGridViewPaintParts.SelectionBackground AndAlso _
            (e.State And DataGridViewElementStates.Selected) = _
                DataGridViewElementStates.Selected Then
            bColor1 = e.InheritedRowStyle.SelectionBackColor
            bColor2 = Color.Black
        Else
            bColor1 = e.InheritedRowStyle.BackColor
            bColor2 = Color.YellowGreen
        End If

        'グラデーションの範囲を計算する
        'ヘッダーを除くセルの部分だけ描画する
        Dim dgv As DataGridView = CType(sender, DataGridView)
        Dim rectLeft2 As Integer = _
            IIf(dgv.RowHeadersVisible, dgv.RowHeadersWidth, 0)
        Dim rectLeft As Integer = _
            rectLeft2 - dgv.HorizontalScrollingOffset
        Dim rectWidth As Integer = _
            dgv.Columns.GetColumnsWidth(DataGridViewElementStates.Visible)
        Dim rect As New Rectangle(rectLeft, e.RowBounds.Top, _
            rectWidth, e.RowBounds.Height - 1)

        'グラデーションブラシを作成
        Using b As New System.Drawing.Drawing2D.LinearGradientBrush( _
            rect, bColor1, bColor2, _
            System.Drawing.Drawing2D.LinearGradientMode.Horizontal)

            '描画する範囲を計算する
            rect.X = rectLeft2
            rect.Width -= dgv.HorizontalScrollingOffset
            'セルを塗りつぶす
            e.Graphics.FillRectangle(b, rect)
        End Using

        'ヘッダーを描画する
        e.PaintHeader(True)

        '背景を描画しないようにする
        e.PaintParts = _
            e.PaintParts And Not DataGridViewPaintParts.Background
    End If
End Sub

'ColumnWidthChangedイベントハンドラ
Private Sub DataGridView1_ColumnWidthChanged(ByVal sender As Object, _
        ByVal e As DataGridViewColumnEventArgs) _
        Handles DataGridView1.ColumnWidthChanged
    Dim dgv As DataGridView = CType(sender, DataGridView)
    dgv.Invalidate()
End Sub
//RowPrePaintイベントハンドラ
private void DataGridView1_RowPrePaint(object sender,
    DataGridViewRowPrePaintEventArgs e)
{
    //背景を描画するか
    if ((e.PaintParts & DataGridViewPaintParts.Background) ==
        DataGridViewPaintParts.Background)
    {
        //選択されているか調べ、色を決定する
        //bColor1が開始色、bColor2が終了色
        Color bColor1, bColor2;
        if ((e.PaintParts & DataGridViewPaintParts.SelectionBackground) ==
                DataGridViewPaintParts.SelectionBackground &&
            (e.State & DataGridViewElementStates.Selected) ==
                DataGridViewElementStates.Selected)
        {
            bColor1 = e.InheritedRowStyle.SelectionBackColor;
            bColor2 = Color.Black;
        }
        else
        {
            bColor1 = e.InheritedRowStyle.BackColor;
            bColor2 = Color.YellowGreen;
        }

        //グラデーションの範囲を計算する
        //ヘッダーを除くセルの部分だけ描画する
        DataGridView dgv = (DataGridView)sender;
        int rectLeft2 = dgv.RowHeadersVisible ? dgv.RowHeadersWidth : 0;
        int rectLeft = rectLeft2 - dgv.HorizontalScrollingOffset;
        int rectWidth = dgv.Columns.GetColumnsWidth(
            DataGridViewElementStates.Visible);
        Rectangle rect = new Rectangle(rectLeft, e.RowBounds.Top,
            rectWidth, e.RowBounds.Height - 1);

        //グラデーションブラシを作成
        using (System.Drawing.Drawing2D.LinearGradientBrush b =
            new System.Drawing.Drawing2D.LinearGradientBrush(
            rect, bColor1, bColor2,
            System.Drawing.Drawing2D.LinearGradientMode.Horizontal))
        {
            //描画する範囲を計算する
            rect.X = rectLeft2;
            rect.Width -= dgv.HorizontalScrollingOffset;
            //セルを塗りつぶす
            e.Graphics.FillRectangle(b, rect);
        }

        //ヘッダーを描画する
        e.PaintHeader(true);

        //背景を描画しないようにする
        e.PaintParts &= ~DataGridViewPaintParts.Background;
    }
}

//ColumnWidthChangedイベントハンドラ
private void DataGridView1_ColumnWidthChanged(object sender,
    DataGridViewColumnEventArgs e)
{
    DataGridView dgv = (DataGridView)sender;
    dgv.Invalidate();
}
先にRowPrePaintイベントは通常背景を描画するために使用すると述べましたが、RowPrePaintは行が描画される前に発生するため、RowPrePaintで背景に描画したとしても、そのままではその後塗りつぶされてしまいます。これを防ぐためには、RowPrePaintイベントハンドラのDataGridViewRowPrePaintEventArgsオブジェクトのPaintPartsプロパティで描画するセルの部分を指定し直します。例えば、RowPrePaintイベントハンドラで背景を描画したのであれば、PaintPartsプロパティからDataGridViewPaintParts.Backgroundを除外すれば、その後背景が描画されなくなります。
補足:MSDNでは、別の方法によって背景のみをRowPrePaintイベントハンドラで描画しています。これについては、後述します。
このように、PaintPartsプロパティを指定して背景を描画しないようにすると、行ヘッダーも描画されなくなります。よって、PaintHeaderメソッドで、行ヘッダーを描画しています。
また、列の幅が変更された時は、その列の部分しか再描画されないため、上記のようにColumnWidthChangedイベントハンドラで全体を再描画しなおさないと、グラデーションがうまく表示されません。(これは、RowPostPaintにもいえることです。)
補足:上の例では、選択されたセルの背景が選択されていないセルの背景と同じになります。こちらで紹介したように、DataGridView.SelectionModeプロパティをFullRowSelectにして、セルを選択すると行全体が選択されるようにした方がよいでしょう。
補足:RowPrePaintを使わなくても、RowPostPaintで背景を塗りつぶすことによって、RowPostPaintだけですべてを描画することもできます(RowPostPaintイベントハンドラでは、DataGridViewRowPostPaintEventArgs.PaintCellsメソッドで、指定した部分だけを描画することができます)。しかしこれは、自動的に描画された行の上に塗りつぶすことになり、効率的ではありません。
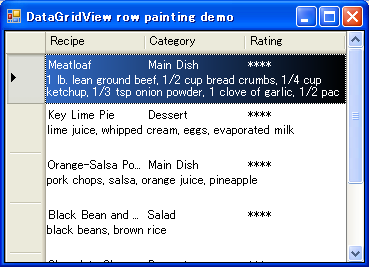
MSDNの「方法 : Windows フォームの DataGridView コントロールの行の外観をカスタマイズする」でもRowPrePaintとRowPostPaintによって行を自分で描画する方法が紹介されています。しかし、少なくとも私にとっては、この説明とコードは非常に分かりにくいものです。ここではこのサンプルについて、少し説明します。
このサンプルでは、RowPrePaintで行の背景を描画し、RowPostPaintで行全体のセルにまたがるテキストと、フォーカス枠を描画しています。しかし、先に私が説明したように、RowPrePaintで背景を描画しているにもかかわらず、PaintPartsプロパティを変更して背景が描画されないようにしていません(フォーカス枠が表示されないようにはしていますが)。それにもかかわらず、行の背景はちゃんとRowPrePaintで描画したものになります。

このからくりは、LoadイベントハンドラでセルスタイルのSelectionBackColor(背景色)をColor.Transparent(透明)にしている点にあります。つまり、普通ならRowPrePaintで描画した背景がその後本来の背景で塗りつぶされてしまうところですが、後から塗りつぶす背景が透明なため、RowPrePaintで描画した背景がそのまま表示されるという訳です。
補足:このMSDNのコードには、グラデーションブラシの作成でバグと思われる箇所があります(幅がおかしくなっています)。上記の私のコードでは、この点は問題ありません。