注意:DataGridViewコントロールは、.NET Framework 2.0で新しく追加されました。
DataGridViewのセルを自分で描画するには、DataGridView.CellPaintingイベントを使用する方法や、カスタムセルクラスを作成してPaintメソッドをオーバーライドする方法などがあります。ここでは、CellPaintingイベントを使用する方法を紹介します。カスタムセルクラスを作成する方法は、こちらで紹介しています。
補足:行の描画は、RowPrePaint、RowPostPaintイベントで行うこともできます。行の描画を行う方法は、こちらで紹介しています。
早速ですが、CellPaintingイベントを使用した幾つかの例を紹介します。
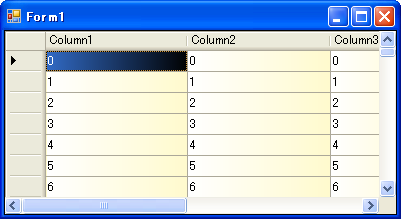
まずは、CellPaintingイベントを使用して、セルの背景にグラデーションがかかるようにしてみましょう。

'CellPaintingイベントハンドラ
Private Sub DataGridView1_CellPainting(ByVal sender As Object, _
        ByVal e As DataGridViewCellPaintingEventArgs) _
        Handles DataGridView1.CellPainting
    'ヘッダー以外のセルで、背景を描画する時
    If e.ColumnIndex >= 0 AndAlso e.RowIndex >= 0 AndAlso _
        (e.PaintParts And DataGridViewPaintParts.Background) = _
            DataGridViewPaintParts.Background Then

        '選択されているか調べ、色を決定する
        'bColor1が開始色、bColor2が終了色
        Dim bColor1, bColor2 As Color
        If (e.PaintParts And DataGridViewPaintParts.SelectionBackground) = _
                DataGridViewPaintParts.SelectionBackground AndAlso _
            (e.State And DataGridViewElementStates.Selected) = _
                DataGridViewElementStates.Selected Then
            bColor1 = e.CellStyle.SelectionBackColor
            bColor2 = Color.Black
        Else
            bColor1 = e.CellStyle.BackColor
            bColor2 = Color.LemonChiffon
        End If

        'グラデーションブラシを作成
        Dim b As New System.Drawing.Drawing2D.LinearGradientBrush( _
            e.CellBounds, bColor1, bColor2, _
            System.Drawing.Drawing2D.LinearGradientMode.Horizontal)
        Try
            'セルを塗りつぶす
            e.Graphics.FillRectangle(b, e.CellBounds)
        Finally
            b.Dispose()
        End Try

        '背景以外が描画されるようにする
        Dim paintParts As DataGridViewPaintParts = _
            e.PaintParts And Not DataGridViewPaintParts.Background
        'セルを描画する
        e.Paint(e.ClipBounds, paintParts)

        '描画が完了したことを知らせる
        e.Handled = True
    End If
End Sub
//CellPaintingイベントハンドラ
private void DataGridView1_CellPainting(object sender,
    DataGridViewCellPaintingEventArgs e)
{
    //ヘッダー以外のセルで、背景を描画する時
    if (e.ColumnIndex >= 0 && e.RowIndex >= 0 &&
        (e.PaintParts & DataGridViewPaintParts.Background) ==
            DataGridViewPaintParts.Background)
    {
        //選択されているか調べ、色を決定する
        //bColor1が開始色、bColor2が終了色
        Color bColor1, bColor2;
        if ((e.PaintParts & DataGridViewPaintParts.SelectionBackground) ==
                DataGridViewPaintParts.SelectionBackground &&
            (e.State & DataGridViewElementStates.Selected) ==
                DataGridViewElementStates.Selected)
        {
            bColor1 = e.CellStyle.SelectionBackColor;
            bColor2 = Color.Black;
        }
        else
        {
            bColor1 = e.CellStyle.BackColor;
            bColor2 = Color.LemonChiffon;
        }
        //グラデーションブラシを作成
        using (System.Drawing.Drawing2D.LinearGradientBrush b =
            new System.Drawing.Drawing2D.LinearGradientBrush(
            e.CellBounds, bColor1, bColor2,
            System.Drawing.Drawing2D.LinearGradientMode.Horizontal))
        {
            //セルを塗りつぶす
            e.Graphics.FillRectangle(b, e.CellBounds);
        }

        //背景以外が描画されるようにする
        DataGridViewPaintParts paintParts =
           e.PaintParts & ~DataGridViewPaintParts.Background;
        //セルを描画する
        e.Paint(e.ClipBounds, paintParts);

        //描画が完了したことを知らせる
        e.Handled = true;
    }
}
ここでは、まずLinearGradientBrushでセルを塗りつぶし、その後セルの背景以外の部分を描画しています。
なお、CellPaintingイベントハンドラでは、描画するセルが列ヘッダーの場合は「e.RowIndex」が-1に、行ヘッダーの場合は「e.ColumnIndex」が-1になります。
補足:ヘッダーセルの背景を上記と同じ方法で描画すると、セルの境界線が消えてしまいます。
DataGridViewCellPaintingEventArgs.Paintメソッドを使えば、セルの指定した部分(セルの境界線、前景、背景など)だけを描画することができます。これを使えば、上の例のように、セルの背景は自分で描画して、セルの前景(テキストなどのコンテンツ部分)は通常通りに描画するということができます。あるいはその逆に、コンテンツ部分を自分で描画して、その他は普通通りに描画することもできます。
描画する部分の指定は、Paintメソッドの2番目のパラメータにDataGridViewPaintParts列挙値(ビットの組み合わせ)を渡すことにより行います。DataGridViewPaintParts列挙体の値とその意味は、以下の通りです(MSDN「DataGridViewPaintParts 列挙体」からの抜粋)。
| DataGridViewPaintParts列挙体のメンバ名 | 説明 |
|---|---|
| All | セルのすべての部分を描画する必要があります。 |
| Background | セルの背景を描画する必要があります。 |
| Border | セルの境界線を描画する必要があります。 |
| ContentBackground | セルの内容の背景を描画する必要があります。 |
| ContentForeground | セルの内容の前景を描画する必要があります。 |
| ErrorIcon | セルのエラー アイコンを描画する必要があります。 |
| Focus | セルの周囲にフォーカスを示す四角形を描画する必要があります。 |
| None | 何も描画しません。 |
| SelectionBackground | セルが選択されたときに、セルの背景を描画する必要があります。 |
上記のコードでは、DataGridViewCellPaintingEventArgs.Paintメソッドでセルの描画する部分を指定する時、e.PaintParts(本来描画されるべき部分)からBackgroundを除外して、背景が描画されないようにしています。
補足:ちなみに、SelectionBackgroundを除外した場合は、セルが選択されていても、選択されていない時と同じ背景色で描画されます。
このようにDataGridViewCellPaintingEventArgs.Paintメソッドを使う以外に、PaintBackgroundやPaintContentを使用してセルの一部を描画することもできます。
DataGridViewCellPaintingEventArgs.PaintBackgroundメソッドでは、セルの境界線と背景が描画されます。具体的には、DataGridViewPaintPartsのBorderとBackgroundを指定してPaintメソッドを呼び出したのと同じになります。さらにPaintBackgroundの第2パラメータにTrueを指定すると、SelectionBackgroundも指定されます。
DataGridViewCellPaintingEventArgs.PaintContentメソッドでは、セルの内容を描画します。具体的には、DataGridViewPaintPartsのErrorIcon、ContentForeground、ContentBackgroundを指定してPaintメソッドを呼び出したのと同じになります。
補足:よって、PaintBackgroundとPaintContentを呼び出してもフォーカス枠(DataGridViewPaintParts.Focus)は描画されません。
セルの背景に画像を表示する方法も、先の例を理解できれば、簡単です。
'セルの背景に表示する画像
Private cellBackImage As New Bitmap("C:\back.gif")

'CellPaintingイベントハンドラ
Private Sub DataGridView1_CellPainting(ByVal sender As Object, _
        ByVal e As DataGridViewCellPaintingEventArgs) _
        Handles DataGridView1.CellPainting
    'ヘッダー以外のセルで、背景を描画する時
    If e.ColumnIndex >= 0 AndAlso e.RowIndex >= 0 AndAlso _
        (e.PaintParts And DataGridViewPaintParts.Background) = _
            DataGridViewPaintParts.Background Then
        '背景だけを描画する
        Dim backParts As DataGridViewPaintParts = _
            e.PaintParts And (DataGridViewPaintParts.Background Or _
                DataGridViewPaintParts.SelectionBackground)
        e.Paint(e.ClipBounds, backParts)

        '画像をセルの範囲いっぱいに表示する
        e.Graphics.DrawImage(cellBackImage, e.CellBounds)

        '背景以外が描画されるようにする
        Dim paintParts As DataGridViewPaintParts = _
            e.PaintParts And Not backParts
        'セルを描画する
        e.Paint(e.ClipBounds, paintParts)

        '描画が完了したことを知らせる
        e.Handled = True
    End If
End Sub
//セルの背景に表示する画像
private Bitmap cellBackImage = new Bitmap("C:\\back.gif");

//CellPaintingイベントハンドラ
private void DataGridView1_CellPainting(object sender,
    DataGridViewCellPaintingEventArgs e)
{
    //ヘッダー以外のセルで、背景を描画する時
    if (e.ColumnIndex >= 0 && e.RowIndex >= 0 &&
        (e.PaintParts & DataGridViewPaintParts.Background) ==
            DataGridViewPaintParts.Background)
    {
        //背景だけを描画する
        DataGridViewPaintParts backParts = e.PaintParts &
            (DataGridViewPaintParts.Background |
            DataGridViewPaintParts.SelectionBackground);
        e.Paint(e.ClipBounds, backParts);

        //画像をセルの範囲いっぱいに表示する
        e.Graphics.DrawImage(cellBackImage, e.CellBounds);

        //背景以外が描画されるようにする
        DataGridViewPaintParts paintParts =
            e.PaintParts & ~backParts;
        //セルを描画する
        e.Paint(e.ClipBounds, paintParts);

        //描画が完了したことを知らせる
        e.Handled = true;
    }
}
ここでは先の例と違って、はじめにセルの背景だけを描画しています。
なおセルの背景に画像を表示する方法としては、「画像で塗りつぶす」で紹介したようなTextureBrushを使用して、背景を画像で塗りつぶす方法も考えられます。
先述したとおり、CellPaintingではヘッダーの描画もできます。CellPaintingイベントハンドラでは、描画するセルが列ヘッダーの場合はDataGridViewCellPaintingEventArgsオブジェクトのRowIndexプロパティが-1になり、行ヘッダーの場合はColumnIndexプロパティが-1になります。その他は、通常のセルを描画する方法とほぼ同じです。
なお、CellPaintingイベントを使用して行ヘッダーに行番号を表示する方法を、こちらで紹介しています。