.NET Frameworkには、PropertyGridコントロールというコンポーネントが標準で用意されています。このPropertyGridコントロールは、Microsoft Visual Studioのプロパティウィンドウと同等の機能を提供します。つまり、オブジェクトのプロパティをリスト表示し、その値をユーザーが変更できるようになっており、さらに、上部には並び方の指定等を行うツールバーが、下部には選択されているプロパティの説明の表示スペース(説明ペイン)が用意されています。
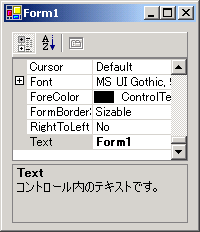
PropertyGridコントロールは、ただオブジェクトを指定するだけで、そのオブジェクトのプロパティを自動的に取得し、リスト表示してくれます。さらに、PropertyGridコントロールでプロパティの値が変更されると、すぐにオブジェクトにその変更が反映されます。例えば、アプリケーションの設定をクラスで行っている場合、PropertyGridコントロールを使えば驚くほど簡単にアプリケーションの設定画面を作成することができるため、今後PropertyGridコントロールを使用したアプリケーションが増えることは間違いないでしょう。(少なくとも、この記事を読んでいただいた方はきっと使いたくなるでしょう。)
補足:PropertyGridコントロールの使い方に関しては、MSDNにある「.NET Framework の PropertyGrid コントロールの高度な活用」や「Visual Studio .NET プロパティ ブラウザによるコンポーネントの本格的な RAD 化」などで詳しく説明されています。この記事の内容がこれらの記事とかなりの部分でかぶっていることをご了承ください。
PropertyGridクラスは、System.Windows.Forms名前空間、System.Windows.Forms.dllアセンブリにあるため、特別なことをすることなく、普通のコントロールと同じようにPropertyGridコントロールを使用することができます。ところがVisual Studioでは、デフォルトで「ツールボックス」の「Windowsフォーム」タブ(あるいは「コンポーネント」タブ)にPropertyGridコントロールが用意されていないため、フォームデザイナを使ってPropertyGridコントロールを配置できません。(PropertyGridコントロールがあまり知られていないのはこのためでしょう。)
「Windowsフォーム」タブにPropertyGridコントロールを追加するには、「ツールボックス」の「Windowsフォーム」タブを右クリックし、表示されるメニューから「アイテムの追加と削除」を選択します。表示される「ツールボックスのカスタマイズ」ダイアログの「.NET Frameworkコンポーネント」タブ内のリストから、「PropertyGrid」という名前の項目を探し、左端のチェックボックスにチェックを入れ、「OK」をクリックしてください。これで「Windowsフォーム」タブに「PropertyGrid」が追加されたはずです。
それでは早速PropertyGridコントロールを使ってみましょう。ここでは、フォーム"Form1"にPropertyGridコントロール"PropertyGrid1"を配置したとします。
まずはPropertyGridコントロールのすばらしさを実感していただくために、次のような一行をForm1のLoadイベントハンドラに記述してみてください。
PropertyGrid1.SelectedObject = Me
PropertyGrid1.SelectedObject = this;
ビルドし実行すると、PropertyGridコントロールにForm1のプロパティがリスト表示されることが分かります(下図)。さらに面白いことに、PropertyGridコントロールでプロパティの値を変更すると、その変更がすぐにForm1に反映されます。例えば、"ControlBox"を"False"にすると、コントロールボックスが消えますし、"BackColor"で背景色を変更できます。
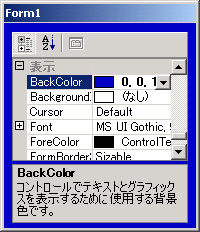
PropertyGrid.SelectedObjectプロパティを設定しただけで、これだけのことができてしまいます。
PropertyGridコントロールで使用される基本的なプロパティ、イベントについてごく簡単に説明しておきます。
PropertyGridコントロールのツールバーを表示しないようにするには、ToolbarVisibleプロパティをFalseにします。LargeButtonsプロパティをTrueにすることにより、ツールバーのボタンの大きさを倍(32X32)にすることができます(アイコンが荒くなり、見た目はよくありません)。説明ペインを表示しないようにするには、HelpVisibleプロパティをFalseにします。
プロパティの並べ方は、PropertySortプロパティで指定します。アルファベット順(Alphabetical)、項目別(Categorized)、項目別でアルファベット順(CategorizedAlphabetical)、並び替えをしない(NoSort)を指定できます。
選択されている項目は、SelectedGridItemプロパティにより取得できます。また、選択されている項目が変更された時、SelectedGridItemChangedイベントが発生します。プロパティの値が変更された時には、PropertyValueChangedイベントが発生します。
次に、クラスを自作し、そのプロパティをPropertyGridコントロールに表示されてみましょう。
まずは、次のようなクラスを作成します。
Public Class TestClass
    Public Enum TestEnum
        One
        Two
        Tree
    End Enum

    Private _integerValue As Integer = 0
    Private _stringValue As String = "こんにちは"
    Private _booleanValue As Boolean = False
    Private _enumValue As TestEnum = TestEnum.One
    Private _colorValue As System.Drawing.Color = _
        System.Drawing.Color.Red

    Public Property IntegerValue() As Integer
        Get
            Return _integerValue
        End Get
        Set(ByVal Value As Integer)
            _integerValue = Value
        End Set
    End Property

    Public Property StringValue() As String
        Get
            Return _stringValue
        End Get
        Set(ByVal Value As String)
            _stringValue = Value
        End Set
    End Property

    Public Property BooleanValue() As Boolean
        Get
            Return _booleanValue
        End Get
        Set(ByVal Value As Boolean)
            _booleanValue = Value
        End Set
    End Property

    Public Property EnumValue() As TestEnum
        Get
            Return _enumValue
        End Get
        Set(ByVal Value As TestEnum)
            _enumValue = Value
        End Set
    End Property

    Public Property ColorValue() As System.Drawing.Color
        Get
            Return _colorValue
        End Get
        Set(ByVal Value As System.Drawing.Color)
            _colorValue = Value
        End Set
    End Property
End Class
public class TestClass
{
    public enum TestEnum
    {
        One,
        Two,
        Tree
    }

    private int _integerValue = 0;
    private string _stringValue = "こんにちは";
    private bool _booleanValue = false;
    private TestEnum _enumValue = TestEnum.One;
    private System.Drawing.Color _colorValue =
        System.Drawing.Color.Red;

    public int IntegerValue
    {
        get {return _integerValue;}
        set {_integerValue = value;}
    }

    public string StringValue
    {
        get {return _stringValue;}
        set {_stringValue = value;}
    }

    public bool BooleanValue
    {
        get {return _booleanValue;}
        set {_booleanValue = value;}
    }

    public TestEnum EnumValue
    {
        get {return _enumValue;}
        set {_enumValue = value;}
    }

    public System.Drawing.Color ColorValue
    {
        get {return _colorValue;}
        set {_colorValue = value;}
    }
}
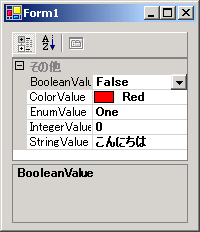
TestClassオブジェクトをPropertyGrid.SelectedObjectプロパティに設定すると、PropertyGridコントロールにTestClassクラスのパブリックプロパティがリスト表示されるはずです(下図)。
Dim obj As New TestClass
PropertyGrid1.SelectedObject = obj
TestClass obj = new TestClass();
PropertyGrid1.SelectedObject = obj;
何もしなくてもPropertyGridコントロールでは、プロパティの型に応じて、適切な値の編集方法が提供されます。例えば、bool(Boolean)型のBooleanValueプロパティは、TrueかFalseかを選択するためにコンボボックスが使用され、同様に、列挙型のEnumValueプロパティもコンボボックスが使用されます。
それ以外では、Color型のプロパティではリストにより色の選択が、Font型のプロパティではフォント選択ダイアログを使用しての選択が、Image型のプロパティでは「ファイルを開く」ダイアログによる画像ファイルの選択と、画像の縮小表示ができるようになっています。
このようにPropertyGridコントロールは実に簡単に使えますので、これだけの知識でもそれなりの事は行えますが、実際に使うとなると、更なる知識が必要となるでしょう。
ここから以下は、特にプロパティの表示方法に関するテクニックを説明していきます。これらのテクニックのほとんどが属性を使ったものであり、System.ComponentModel名前空間にあるクラスを使用しているため、以下のサンプルでは、C#では
using System.ComponentModel;
VB.NETでは
Imports System.ComponentModel
が宣言されているものとします。
Visual Studioの場合、プロパティがデフォルト値(規定値)でないときに、値が太字で表示されます。上記の"TestClass"の例では、すべての値が太字で表示されます。プロパティがデフォルト値でないときだけ値が太字で表示するには、DefaultValueAttributeを使用して、プロパティのデフォルト値を決めておきます。
次の例では、IntegerValueプロパティのデフォルト値を0にしています。
<DefaultValue(0)> _
Public Property IntegerValue() As Integer
    Get
        Return _integerValue
    End Get
    Set(ByVal Value As Integer)
        _integerValue = Value
    End Set
End Property
[DefaultValue(0)]
public int IntegerValue
{
    get {return _integerValue;}
    set {_integerValue = value;}
}
DefaultValueAttributeのコンストラクタには、Boolean、Byte、Char、Double、Int16Int32、Int64、Object、Single、String型の値を指定できますが、それ以外の型の場合はそのままではできません。
一つの方法としては、TypeConverterによって指定した型に変換できる文字列をDefaultValueAttributeコンストラクタに指定する方法があります。この文字列には、例えばColor型の赤であれば"Red"、Size型の (10, 20) であれば"10, 20"といった文字列が使えます。
補足:この方法は、掲示板でご指摘をいただきました。
次の例では、ColorValueプロパティのデフォルト値をColor.Redにしています。
<DefaultValue(GetType(System.Drawing.Color), "Red")> _
Public Property ColorValue() As System.Drawing.Color
    Get
        Return _colorValue
    End Get
    Set(value As System.Drawing.Color)
        _colorValue = value
    End Set
End Property
[DefaultValue(typeof(System.Drawing.Color), "Red")]
public System.Drawing.Color ColorValue
{
    get { return _colorValue; }
    set { _colorValue = value; }
}
もう一つの方法としては、"ShouldSerializeMyProperty"メソッドを使用する方法があります。クラスに"ShouldSerializeMyProperty"という名前でbool(Boolean)を返すメソッドを作り、デフォルト値ならFalse、そうでなければTrueを返すようにします。(詳しくはMSDNの「PropertyDescriptor.ShouldSerializeValue メソッド」等をご覧ください。)
次の例ではこの方法でColorValueプロパティのデフォルト値をColor.Redにしています。
Public Property ColorValue() As System.Drawing.Color
    Get
        Return _colorValue
    End Get
    Set(ByVal Value As System.Drawing.Color)
        _colorValue = Value
    End Set
End Property

Private Function ShouldSerializeColorValue() As Boolean
    Return Not ColorValue.Equals(System.Drawing.Color.Red)
End Function
public System.Drawing.Color ColorValue
{
    get {return _colorValue;}
    set {_colorValue = value;}
}

private bool ShouldSerializeColorValue()
{
    return ColorValue != System.Drawing.Color.Red;
}
PropertyGridコントロールで一番初めに選択されるプロパティを指定するには、クラスにDefaultPropertyAttributeを適用します。
次の例では、"TestClass"クラスのデフォルトプロパティを"StringValue"プロパティにしています。
<DefaultProperty("StringValue")> _
Public Class TestClass
    '(省略)
End Class
[DefaultProperty("StringValue")]
public class TestClass
{
    //(省略)
}
PropertyGridコントロールの説明ペインに、選択されているプロパティの説明を表示するには、DescriptionAttributeを使用します。
次の例では、StringValueプロパティの説明を設定しています。
<Description("ここにStringValueの説明を書きます。")> _
Public Property StringValue() As String
    Get
        Return _stringValue
    End Get
    Set(ByVal Value As String)
        _stringValue = Value
    End Set
End Property
[Description("ここにStringValueの説明を書きます。")]
public string StringValue
{
    get {return _stringValue;}
    set {_stringValue = value;}
}
PropertyGridコントロールではプロパティを項目(カテゴリ)別に表示できます。項目別に表示したとき、プロパティはデフォルトで「その他」に分類されますが、CategoryAttributeにより、プロパティの項目を指定することができます。
次の例では、ColorValueプロパティの項目を"表示"にしています。
<Category("表示")> _
Public Property ColorValue() As System.Drawing.Color
    Get
        Return _colorValue
    End Get
    Set(ByVal Value As System.Drawing.Color)
        _colorValue = Value
    End Set
End Property
[Category("表示")]
public System.Drawing.Color ColorValue
{
    get {return _colorValue;}
    set {_colorValue = value;}
}
PropertyGridコントロールに表示したくないプロパティには、Falseを指定したBrowsableAttributeを適用します。
次の例では、BooleanValueプロパティをPropertyGridコントロールに表示しないようにしています。
<Browsable(False)> _
Public Property BooleanValue() As Boolean
    Get
        Return _booleanValue
    End Get
    Set(ByVal Value As Boolean)
        _booleanValue = Value
    End Set
End Property
[Browsable(false)]
public bool BooleanValue
{
    get {return _booleanValue;}
    set {_booleanValue = value;}
}
プロパティの値をユーザーが編集できないようにするには、Trueを指定したReadOnlyAttributeを使用します。
次の例では、IntegerValueプロパティをPropertyGridコントロールでユーザーが編集できないようにしています。
<ReadOnlyAttribute(True)> _
Public Property IntegerValue() As Integer
    Get
        Return _integerValue
    End Get
    Set(ByVal Value As Integer)
        _integerValue = Value
    End Set
End Property
[ReadOnly(true)]
public int IntegerValue
{
    get {return _integerValue;}
    set {_integerValue = value;}
}
右側にボタンを表示し、このボタンをクリックすることにより「ファイルを開く」ダイアログを表示して、プロパティの値を設定できるようにするには、FileNameEditorをエディタに指定したEditorAttributeを使用します。なお、System.Designアセンブリを参照に追加する必要があります。
次の例では、StringValueプロパティにボタンを表示し、「ファイルを開く」ダイアログにより、ファイルを選択できるようにしています。
<Editor(GetType(System.Windows.Forms.Design.FileNameEditor), _
GetType(System.Drawing.Design.UITypeEditor))> _
Public Property StringValue() As String
    Get
        Return _stringValue
    End Get
    Set(ByVal Value As String)
        _stringValue = Value
    End Set
End Property
[Editor(typeof(System.Windows.Forms.Design.FileNameEditor),
        typeof(System.Drawing.Design.UITypeEditor))]
public string StringValue
{
    get {return _stringValue;}
    set {_stringValue = value;}
}
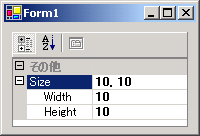
例えば次のようなSize型のプロパティは、PropertyGridコントロールでは展開してSizeクラスのHeightとWidthプロパティが表示できます(下図)。
Public Class TestClass
    Private _size As New Size(10, 10)

    Public Property Size() As Size
        Get
            Return _size
        End Get
        Set(ByVal Value As Size)
            _size = value
        End Set
    End Property
End Class
public class TestClass
{
    private Size _size = new Size(10, 10);

    public Size Size
    {
        get {return _size;}
        set {_size = value;}
    }
}
しかし次のような自作のクラスの場合は、展開ができず、値を変更することができません。
Public Class CustomClass
    Private _number As Integer = 0
    Private _message As String = "hello"

    Public Property Number() As Integer
        Get
            Return _number
        End Get
        Set(ByVal Value As Integer)
            _number = Value
        End Set
    End Property

    Public Property Message() As String
        Get
            Return _message
        End Get
        Set(ByVal Value As String)
            _message = Value
        End Set
    End Property
End Class

Public Class TestClass
    Private _custom As New CustomClass

    Public Property Custom() As CustomClass
        Get
            Return _custom
        End Get
        Set(ByVal Value As CustomClass)
            _custom = Value
        End Set
    End Property
End Class
public class CustomClass
{
    private int _number = 0;
    private string _message = "hello";

    public int Number
    {
        get {return _number;}
        set {_number = value;}
    }

    public string Message
    {
        get {return _message;}
        set {_message = value;}
    }
}

public class TestClass
{
    private CustomClass _custom = new CustomClass();

    public CustomClass Custom
    {
        get {return _custom;}
        set {_custom = value;}
    }
}
このような自作のクラス型のプロパティでもPropertyGridコントロールで展開ができるようにするには、TypeConverterAttributeを"CustomClass"クラスに適用し、使用する型コンバータ(TypeConverter)としてExpandableObjectConverterを指定します。具体的には、次のようになります。
<TypeConverter(GetType(ExpandableObjectConverter))> _
Public Class CustomClass
    '(省略)
End Class
[TypeConverter(typeof(ExpandableObjectConverter))]
public class CustomClass
{
    //(省略)
}
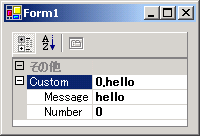
これで"CustomClass"型のプロパティが展開できるようになりました。しかし、Size型やFont型のプロパティと違い、プロパティそのものの値を表示する部分には、クラス名が表示され、編集できません。ここに表示される文字列を制御し、さらに編集できるようにするには、ExpandableObjectConverterクラスの派生クラスを作成し、CanConvertTo、CanConvertFrom、ConvertTo、ConvertFromメソッドをそれぞれオーバーライドします。(型コンバータにより、オブジェクトを文字列に、また、文字列をオブジェクトに変換する方法を提供します。)
次のような型コンバータクラスを使用することにより、CustomClassのNumberとMessageプロパティがコンマで区切られた文字列として表示されるようになります(編集もできるようになります)(下図)。
Public Class CustomClassConverter
    Inherits ExpandableObjectConverter

    'コンバータがオブジェクトを指定した型に変換できるか
    '(変換できる時はTrueを返す)
    'ここでは、CustomClass型のオブジェクトには変換可能とする
    Public Overloads Overrides Function CanConvertTo( _
        ByVal context As ITypeDescriptorContext, _
        ByVal destinationType As Type) As Boolean
        If destinationType Is GetType(CustomClass) Then
            Return True
        End If
        Return MyBase.CanConvertTo(context, destinationType)
    End Function

    '指定した値オブジェクトを、指定した型に変換する
    'CustomClass型のオブジェクトをString型に変換する方法を提供する
    Public Overloads Overrides Function ConvertTo( _
        ByVal context As ITypeDescriptorContext, _
        ByVal culture As System.Globalization.CultureInfo, _
        ByVal value As Object, _
        ByVal destinationType As Type) As Object
        If destinationType Is GetType(String) And TypeOf value Is CustomClass Then
            Dim cc As CustomClass = CType(value, CustomClass)
            Return cc.Number.ToString() + "," + cc.Message
        End If
        Return MyBase.ConvertTo(context, culture, value, destinationType)
    End Function

    'コンバータが特定の型のオブジェクトをコンバータの型に変換できるか
    '(変換できる時はTrueを返す)
    'ここでは、String型のオブジェクトなら変換可能とする
    Public Overloads Overrides Function CanConvertFrom( _
        ByVal context As ITypeDescriptorContext, _
        ByVal sourceType As Type) As Boolean
        If sourceType Is GetType(String) Then
            Return True
        End If
        Return MyBase.CanConvertFrom(context, sourceType)
    End Function

    '指定した値をコンバータの型に変換する
    'String型のオブジェクトをCustomClass型に変換する方法を提供する
    Public Overloads Overrides Function ConvertFrom( _
        ByVal context As ITypeDescriptorContext, _
        ByVal culture As System.Globalization.CultureInfo, _
        ByVal value As Object) As Object
        If TypeOf value Is String Then
            Dim ss As String() = value.ToString().Split(New Char() {","c}, 2)
            Dim cc As New CustomClass
            cc.Number = Integer.Parse(ss(0))
            cc.Message = ss(1)

            Return cc
        End If
        Return MyBase.ConvertFrom(context, culture, value)
    End Function
End Class
public class CustomClassConverter : ExpandableObjectConverter
{
    //コンバータがオブジェクトを指定した型に変換できるか
    //(変換できる時はTrueを返す)
    //ここでは、CustomClass型のオブジェクトには変換可能とする
    public override bool CanConvertTo(
        ITypeDescriptorContext context, Type destinationType)
    {
        if (destinationType == typeof(CustomClass))
            return true;
        return base.CanConvertTo(context, destinationType);
    }

    //指定した値オブジェクトを、指定した型に変換する
    //CustomClass型のオブジェクトをString型に変換する方法を提供する
    public override object ConvertTo(ITypeDescriptorContext context,
        CultureInfo culture, object value, Type destinationType)
    {
        if (destinationType == typeof(string) &&
            value is CustomClass)
        {
            CustomClass cc = (CustomClass) value;
            return cc.Number.ToString() + "," + cc.Message;
        }
        return base.ConvertTo(context, culture, value, destinationType);
    }

    //コンバータが特定の型のオブジェクトをコンバータの型に変換できるか
    //(変換できる時はTrueを返す)
    //ここでは、String型のオブジェクトなら変換可能とする
    public override bool CanConvertFrom(
        ITypeDescriptorContext context, Type sourceType)
    {
        if (sourceType == typeof(string))
            return true;
        return base.CanConvertFrom (context, sourceType);
    }

    //指定した値をコンバータの型に変換する
    //String型のオブジェクトをCustomClass型に変換する方法を提供する
    public override object ConvertFrom(ITypeDescriptorContext context,
        CultureInfo culture, object value)
    {
        if (value is string)
        {
            string[] ss = value.ToString().Split(new char[] {','}, 2);
            CustomClass cc = new CustomClass();
            cc.Number = int.Parse(ss[0]);
            cc.Message = ss[1];

            return cc;
        }
        return base.ConvertFrom(context, culture, value);
    }
}
使い方は前と同じです。
<TypeConverter(GetType(CustomClassConverter))> _
Public Class CustomClass
    '(省略)
End Class
[TypeConverter(typeof(CustomClassConverter))]
public class CustomClass
{
    //(省略)
}
MSDNにある「.NET Framework の PropertyGrid コントロールの高度な活用」及び「Visual Studio .NET プロパティ ブラウザによるコンポーネントの本格的な RAD 化」では、さらに、「簡単なドロップダウンプロパティを提供する方法」、「プロパティのカスタムUIを提供する方法」などが紹介されています。