注意:画像の表示方法が分からないという方は、まず「コントロールやフォームに画像を表示する」をご覧ください。また、文字列を描画する方法は、「文字を描く」をご覧ください。
Graphics.DrawStringメソッドで文字列を描画したときの大きさを計測するには、Graphics.MeasureStringメソッドを使います。しかしMeasureStringメソッドはグリフの突出に備えて前後に余白を入れますので、実際に文字列を描画したときの大きさよりも通常は大きく計測されます。
これとは別に、Graphics.MeasureCharacterRangesメソッドを使って計測することもできます。MeasureCharacterRangesメソッドでは、文字列内のどの範囲を計測するか(例えば、3文字目から6文字目までなど)を指定して、大きさを計測できます。計測する範囲は複数指定でき、文字列の大きさがRegion配列で返されます。
通常は、MeasureCharacterRangesメソッドを使った方がより実際の大きさに近い値を返します。しかしこの場合も余白はありますし、フォントのスタイルが太字や斜体だった場合は実際の大きさより狭く計測されることもあります。
補足:MSDN(Graphics.MeasureStringメソッド)には、次のように書かれています。
「(たとえば、書式設定されたテキストを実装するときに) レイアウト内の隣接する文字列に適したメトリックを取得するには、MeasureCharacterRanges メソッドを使用するか、または StringFormat を受け取る MeasureString メソッドのうちの 1 つを使用し、GenericTypographic を渡します。 また、Graphics の TextRenderingHint が AntiAlias である必要があります。」
つまり、MeasureStringメソッドを呼び出すときにStringFormat.GenericTypographicプロパティを渡すと、MeasureCharacterRangesメソッドと同じ結果を得られるようです。また、Graphics.TextRenderingHintプロパティをAntiAliasにした方がより正確な値を得られるかもしれません。
補足:計測する文字列の前後に空白文字があり、これを無視したくない場合は、StringFormat.FormatFlagsプロパティにMeasureTrailingSpacesを加えてください。
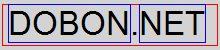
下のコードでは、"DOBON.NET"という文字列を描画しています。そして、この文字列の大きさをMeasureStringメソッドで計測した結果を赤い四角で描画し、さらに、"DOBON"と"NET"の大きさをMeasureCharacterRangesメソッドで計測した結果を青い四角で描画しています。結果は、PictureBoxコントロール"PictureBox1"に表示しています。
'Imports System.Drawing

'表示する文字列
Dim s As String = "DOBON.NET"

'描画先とするImageオブジェクトを作成する
Dim canvas As New Bitmap(PictureBox1.Width, PictureBox1.Height)
'ImageオブジェクトのGraphicsオブジェクトを作成する
Dim g As Graphics = Graphics.FromImage(canvas)

'フォントオブジェクトの作成
Dim fnt As New Font("Arial", 25)
'StringFormatオブジェクトの作成
Dim sf As New StringFormat

'文字列を描画する
g.DrawString(s, fnt, Brushes.Black, 0, 0, sf)

'幅の最大値が1000ピクセルとして、文字列を描画するときの大きさを計測する
Dim stringSize As SizeF = g.MeasureString(s, fnt, 1000, sf)
'取得した文字列の大きさを使って四角を描画する
g.DrawRectangle(Pens.Red, 0, 0, stringSize.Width, stringSize.Height)

'"DOBON"と"NET"の大きさを計測する
'計測する文字の範囲を指定する
Dim characterRanges As CharacterRange() = _
    {New CharacterRange(0, 5), New CharacterRange(6, 3)}
sf.SetMeasurableCharacterRanges(characterRanges)
'文字列のレイアウト四角形を指定する
Dim layoutRect As New RectangleF(0, 0, 500, 100)
'文字列に外接するRegion配列を取得する
Dim stringRegions As Region() = _
    g.MeasureCharacterRanges(s, fnt, layoutRect, sf)
'取得した文字列の大きさを使って四角を描画する
Dim rect1 As RectangleF = stringRegions(0).GetBounds(g)
g.DrawRectangle(Pens.Blue, Rectangle.Round(rect1))
Dim rect2 As RectangleF = stringRegions(1).GetBounds(g)
g.DrawRectangle(Pens.Blue, Rectangle.Round(rect2))

'リソースを解放する
fnt.Dispose()
sf.Dispose()
g.Dispose()

'PictureBox1に表示する
PictureBox1.Image = canvas
//using System.Drawing;

//表示する文字列
string s = "DOBON.NET";

//描画先とするImageオブジェクトを作成する
Bitmap canvas = new Bitmap(PictureBox1.Width, PictureBox1.Height);
//ImageオブジェクトのGraphicsオブジェクトを作成する
Graphics g = Graphics.FromImage(canvas);

//フォントオブジェクトの作成
Font fnt = new Font("Arial", 25);
//StringFormatオブジェクトの作成
StringFormat sf = new StringFormat();

//文字列を描画する
g.DrawString(s, fnt, Brushes.Black, 0, 0, sf);

//幅の最大値が1000ピクセルとして、文字列を描画するときの大きさを計測する
SizeF stringSize = g.MeasureString(s, fnt, 1000, sf);
//取得した文字列の大きさを使って四角を描画する
g.DrawRectangle(Pens.Red, 0, 0, stringSize.Width, stringSize.Height);

//"DOBON"と"NET"の大きさを計測する
//計測する文字の範囲を指定する
CharacterRange[] characterRanges =
    {new CharacterRange(0, 5),
    new CharacterRange(6, 3)};
sf.SetMeasurableCharacterRanges(characterRanges);
//文字列のレイアウト四角形を指定する
RectangleF layoutRect = new RectangleF(0, 0, 500, 100);
//文字列に外接するRegion配列を取得する
Region[] stringRegions = g.MeasureCharacterRanges(s, fnt, layoutRect, sf);
//取得した文字列の大きさを使って四角を描画する
RectangleF rect1 = stringRegions[0].GetBounds(g);
g.DrawRectangle(Pens.Blue, Rectangle.Round(rect1));
RectangleF rect2 = stringRegions[1].GetBounds(g);
g.DrawRectangle(Pens.Blue, Rectangle.Round(rect2));

//リソースを解放する
fnt.Dispose();
sf.Dispose();
g.Dispose();

//PictureBox1に表示する
PictureBox1.Image = canvas;
.NET Framework 2.0から追加されたTextRenderer.DrawTextメソッドを使用して文字列を描画するときは、TextRenderer.MeasureTextメソッドを使って文字列の大きさを計測します。
このメソッドもグリフの突出に備えて余白を入れますので、実際に描画される大きさよりも通常は大きく計測されます。余白なしで計測(および描画)をするには、MeasureTextメソッド(およびDrawTextメソッド)を呼び出すときにTextFormatFlags.NoPaddingを指定します。
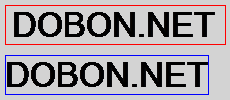
以下の例では、DrawTextメソッドで文字列を描画した後で、MeasureTextメソッドで計測した大きさで赤い四角を描画しています。また、その下にはTextFormatFlags.NoPaddingを指定して文字列を描画しています。
'Imports System.Drawing
'Imports System.Windows.Forms

'表示する文字列
Dim s As String = "DOBON.NET"

'描画先とするImageオブジェクトを作成する
Dim canvas As New Bitmap(PictureBox1.Width, PictureBox1.Height)
'ImageオブジェクトのGraphicsオブジェクトを作成する
Dim g As Graphics = Graphics.FromImage(canvas)

'フォントオブジェクトの作成
Dim fnt As New Font("Arial", 25)

'文字列を描画する
TextRenderer.DrawText(g, s, fnt, New Point(0, 0), Color.Black)
'文字列を描画するときの大きさを計測する
Dim strSize As Size = TextRenderer.MeasureText(g, s, fnt)
'取得した文字列の大きさを使って四角を描画する
g.DrawRectangle(Pens.Red, 0, 0, strSize.Width, strSize.Height)

'NoPaddingにして、文字列を描画する
TextRenderer.DrawText(g, s, fnt, New Point(0, 50), Color.Black, _
    TextFormatFlags.NoPadding)
'大きさを計測して、四角を描画する
Dim nopadSize As Size = TextRenderer.MeasureText(g, s, fnt, _
    New Size(1000, 1000), TextFormatFlags.NoPadding)
g.DrawRectangle(Pens.Blue, 0, 50, nopadSize.Width, nopadSize.Height)

'リソースを解放する
fnt.Dispose()
g.Dispose()

'PictureBox1に表示する
PictureBox1.Image = canvas
//using System.Drawing;
//using System.Windows.Forms;

//表示する文字列
string s = "DOBON.NET";

//描画先とするImageオブジェクトを作成する
Bitmap canvas = new Bitmap(PictureBox1.Width, PictureBox1.Height);
//ImageオブジェクトのGraphicsオブジェクトを作成する
Graphics g = Graphics.FromImage(canvas);

//フォントオブジェクトの作成
Font fnt = new Font("Arial", 25);

//文字列を描画する
TextRenderer.DrawText(g, s, fnt, new Point(0, 0), Color.Black);
//文字列を描画するときの大きさを計測する
Size strSize = TextRenderer.MeasureText(g, s, fnt);
//取得した文字列の大きさを使って四角を描画する
g.DrawRectangle(Pens.Red, 0, 0, strSize.Width, strSize.Height);

//NoPaddingにして、文字列を描画する
TextRenderer.DrawText(g, s, fnt, new Point(0, 50), Color.Black,
    TextFormatFlags.NoPadding);
//大きさを計測して、四角を描画する
Size nopadSize = TextRenderer.MeasureText(g, s, fnt,
    new Size(1000, 1000), TextFormatFlags.NoPadding);
g.DrawRectangle(Pens.Blue, 0, 50, nopadSize.Width, nopadSize.Height);

//リソースを解放する
fnt.Dispose();
g.Dispose();

//PictureBox1に表示する
PictureBox1.Image = canvas;
今まで紹介した方法では、どの方法でもどんぴしゃりな大きさを計測することはできません。正確な大きさを知るには、結局は実際に描画してみるしかないようです。
そのようにして計測する例が、「MeasureString and DrawString difference」にあります。これを参考にさせていただいて、私も以下のようなコードを書いてみました。この例では、DrawStringメソッドで描画した時の大きさを計測しています。やっていることは、Bitmapに文字列を描画して、Bitmap.GetPixelメソッドで1つ1つのピクセルの色を調べているだけです。
'Imports System.Drawing

''' <summary>
''' Graphics.DrawStringで文字列を描画した時の大きさと位置を正確に計測する
''' </summary>
''' <param name="g">文字列を描画するGraphics</param>
''' <param name="text">描画する文字列</param>
''' <param name="font">描画に使用するフォント</param>
''' <param name="proposedSize">これ以上大きいことはないというサイズ。
''' できるだけ小さくすること。</param>
''' <param name="stringFormat">描画に使用するStringFormat</param>
''' <returns>文字列が描画される範囲。
''' 見つからなかった時は、Rectangle.Empty。</returns>
Public Shared Function MeasureStringPrecisely(g As Graphics, _
        text As String, font As Font, proposedSize As Size, _
        stringFormat As StringFormat) As Rectangle
    '解像度を引き継いで、Bitmapを作成する
    Dim bmp As New Bitmap(proposedSize.Width, proposedSize.Height, g)
    'BitmapのGraphicsを作成する
    Dim bmpGraphics As Graphics = Graphics.FromImage(bmp)
    'Graphicsのプロパティを引き継ぐ
    bmpGraphics.TextRenderingHint = g.TextRenderingHint
    bmpGraphics.TextContrast = g.TextContrast
    bmpGraphics.PixelOffsetMode = g.PixelOffsetMode
    '文字列の描かれていない部分の色を取得する
    Dim backColor As Color = bmp.GetPixel(0, 0)
    '実際にBitmapに文字列を描画する
    bmpGraphics.DrawString(text, font, Brushes.Black, _
        New RectangleF(0.0F, 0.0F, proposedSize.Width, proposedSize.Height), _
        stringFormat)
    bmpGraphics.Dispose()
    '文字列が描画されている範囲を計測する
    Dim resultRect As Rectangle = MeasureForegroundArea(bmp, backColor)
    bmp.Dispose()

    Return resultRect
End Function

''' <summary>
''' 指定されたBitmapで、backColor以外の色が使われている範囲を計測する
''' </summary>
Private Shared Function MeasureForegroundArea(bmp As Bitmap, _
        backColor As Color) As Rectangle
    Dim backColorArgb As Integer = backColor.ToArgb()
    Dim maxWidth As Integer = bmp.Width
    Dim maxHeight As Integer = bmp.Height

    Dim x As Integer
    Dim y As Integer

    '左側の空白部分を計測する
    Dim leftPosition As Integer = -1
    For x = 0 To maxWidth - 1
        For y = 0 To maxHeight - 1
            '違う色を見つけたときは、位置を決定する
            If bmp.GetPixel(x, y).ToArgb() <> backColorArgb Then
                leftPosition = x
                Exit For
            End If
        Next
        If 0 <= leftPosition Then
            Exit For
        End If
    Next
    '違う色が見つからなかった時
    If leftPosition < 0 Then
        Return Rectangle.Empty
    End If

    '右側の空白部分を計測する
    Dim rightPosition As Integer = -1
    For x = maxWidth - 1 To leftPosition + 1 Step -1
        For y = 0 To maxHeight - 1
            If bmp.GetPixel(x, y).ToArgb() <> backColorArgb Then
                rightPosition = x
                Exit For
            End If
        Next
        If 0 <= rightPosition Then
            Exit For
        End If
    Next
    If rightPosition < 0 Then
        rightPosition = leftPosition
    End If

    '上の空白部分を計測する
    Dim topPosition As Integer = -1
    For y = 0 To maxHeight - 1
        For x = leftPosition To rightPosition
            If bmp.GetPixel(x, y).ToArgb() <> backColorArgb Then
                topPosition = y
                Exit For
            End If
        Next
        If 0 <= topPosition Then
            Exit For
        End If
    Next
    If topPosition < 0 Then
        Return Rectangle.Empty
    End If

    '下の空白部分を計測する
    Dim bottomPosition As Integer = -1
    For y = maxHeight - 1 To topPosition + 1 Step -1
        For x = leftPosition To rightPosition
            If bmp.GetPixel(x, y).ToArgb() <> backColorArgb Then
                bottomPosition = y
                Exit For
            End If
        Next
        If 0 <= bottomPosition Then
            Exit For
        End If
        y -= 1
    Next
    If bottomPosition < 0 Then
        bottomPosition = topPosition
    End If

    '結果を返す
    Return New Rectangle(leftPosition, topPosition, _
        rightPosition - leftPosition, bottomPosition - topPosition)
End Function

Private Shared Function MeasureForegroundArea(bmp As Bitmap) As Rectangle
    Return MeasureForegroundArea(bmp, bmp.GetPixel(0, 0))
End Function
//using System.Drawing;

/// <summary>
/// Graphics.DrawStringで文字列を描画した時の大きさと位置を正確に計測する
/// </summary>
/// <param name="g">文字列を描画するGraphics</param>
/// <param name="text">描画する文字列</param>
/// <param name="font">描画に使用するフォント</param>
/// <param name="proposedSize">これ以上大きいことはないというサイズ。
/// できるだけ小さくすること。</param>
/// <param name="stringFormat">描画に使用するStringFormat</param>
/// <returns>文字列が描画される範囲。
/// 見つからなかった時は、Rectangle.Empty。</returns>
public static Rectangle MeasureStringPrecisely(Graphics g,
    string text, Font font, Size proposedSize, StringFormat stringFormat)
{
    //解像度を引き継いで、Bitmapを作成する
    Bitmap bmp = new Bitmap(proposedSize.Width, proposedSize.Height, g);
    //BitmapのGraphicsを作成する
    Graphics bmpGraphics = Graphics.FromImage(bmp);
    //Graphicsのプロパティを引き継ぐ
    bmpGraphics.TextRenderingHint = g.TextRenderingHint;
    bmpGraphics.TextContrast = g.TextContrast;
    bmpGraphics.PixelOffsetMode = g.PixelOffsetMode;
    //文字列の描かれていない部分の色を取得する
    Color backColor = bmp.GetPixel(0, 0);
    //実際にBitmapに文字列を描画する
    bmpGraphics.DrawString(text, font, Brushes.Black,
        new RectangleF(0f, 0f, proposedSize.Width, proposedSize.Height),
        stringFormat);
    bmpGraphics.Dispose();
    //文字列が描画されている範囲を計測する
    Rectangle resultRect = MeasureForegroundArea(bmp, backColor);
    bmp.Dispose();

    return resultRect;
}

/// <summary>
/// 指定されたBitmapで、backColor以外の色が使われている範囲を計測する
/// </summary>
private static Rectangle MeasureForegroundArea(Bitmap bmp, Color backColor)
{
    int backColorArgb = backColor.ToArgb();
    int maxWidth = bmp.Width;
    int maxHeight = bmp.Height;

    //左側の空白部分を計測する
    int leftPosition = -1;
    for (int x = 0; x < maxWidth; x++)
    {
        for (int y = 0; y < maxHeight; y++)
        {
            //違う色を見つけたときは、位置を決定する
            if (bmp.GetPixel(x, y).ToArgb() != backColorArgb)
            {
                leftPosition = x;
                break;
            }
        }
        if (0 <= leftPosition)
        {
            break;
        }
    }
    //違う色が見つからなかった時
    if (leftPosition < 0)
    {
        return Rectangle.Empty;
    }

    //右側の空白部分を計測する
    int rightPosition = -1;
    for (int x = maxWidth - 1; leftPosition < x; x--)
    {
        for (int y = 0; y < maxHeight; y++)
        {
            if (bmp.GetPixel(x, y).ToArgb() != backColorArgb)
            {
                rightPosition = x;
                break;
            }
        }
        if (0 <= rightPosition)
        {
            break;
        }
    }
    if (rightPosition < 0)
    {
        rightPosition = leftPosition;
    }

    //上の空白部分を計測する
    int topPosition = -1;
    for (int y = 0; y < maxHeight; y++)
    {
        for (int x = leftPosition; x <= rightPosition; x++)
        {
            if (bmp.GetPixel(x, y).ToArgb() != backColorArgb)
            {
                topPosition = y;
                break;
            }
        }
        if (0 <= topPosition)
        {
            break;
        }
    }
    if (topPosition < 0)
    {
        return Rectangle.Empty;
    }

    //下の空白部分を計測する
    int bottomPosition = -1;
    for (int y = maxHeight - 1; topPosition < y; y--)
    {
        for (int x = leftPosition; x <= rightPosition; x++)
        {
            if (bmp.GetPixel(x, y).ToArgb() != backColorArgb)
            {
                bottomPosition = y;
                break;
            }
        }
        if (0 <= bottomPosition)
        {
            break;
        }
    }
    if (bottomPosition < 0)
    {
        bottomPosition = topPosition;
    }

    //結果を返す
    return new Rectangle(leftPosition, topPosition,
        rightPosition - leftPosition, bottomPosition - topPosition);
}

private static Rectangle MeasureForegroundArea(Bitmap bmp)
{
    return MeasureForegroundArea(bmp, bmp.GetPixel(0, 0));
}
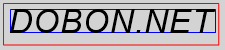
このメソッドを実際に使用して、MeasureStringメソッドの結果を比較する例を以下に示します。このコードは、まずMeasureStringメソッドが返す大きさで赤い四角を描画し、次に上記のメソッドが返す大きさ(範囲)で青い四角を描画し、最後に文字列を黒で描画しています。結果は、今まで通り、PictureBoxコントロール"PictureBox1"に表示しています。
'Imports System.Drawing

'表示する文字列
Dim s As String = "DOBON.NET"

'描画先とするImageオブジェクトを作成する
Dim canvas As New Bitmap(PictureBox1.Width, PictureBox1.Height)
'ImageオブジェクトのGraphicsオブジェクトを作成する
Dim g As Graphics = Graphics.FromImage(canvas)
g.SmoothingMode = System.Drawing.Drawing2D.SmoothingMode.HighQuality
g.TextRenderingHint = System.Drawing.Text.TextRenderingHint.AntiAlias

'フォントオブジェクトの作成
Dim fnt As New Font("Arial", 25, FontStyle.Italic)
'StringFormatオブジェクトの作成
Dim sf As New StringFormat()

'幅の最大値が1000ピクセルとして、文字列を描画するときの大きさを計測する
Dim stringSize As SizeF = g.MeasureString(s, fnt, 1000, sf)
'取得した文字列の大きさを使って四角を描画する
g.DrawRectangle(Pens.Red, 0, 0, stringSize.Width, stringSize.Height)

'より正確に大きさを計測する
Dim rect As Rectangle = MeasureStringPrecisely(g, s, fnt, canvas.Size, sf)
g.DrawRectangle(Pens.Blue, rect.Left, rect.Top, rect.Width, rect.Height)

'文字列を描画する
g.DrawString(s, fnt, Brushes.Black, 0, 0, sf)

'リソースを解放する
fnt.Dispose()
sf.Dispose()
g.Dispose()

'PictureBox1に表示する
PictureBox1.Image = canvas
//using System.Drawing;

//表示する文字列
string s = "DOBON.NET";

//描画先とするImageオブジェクトを作成する
Bitmap canvas = new Bitmap(PictureBox1.Width, PictureBox1.Height);
//ImageオブジェクトのGraphicsオブジェクトを作成する
Graphics g = Graphics.FromImage(canvas);
g.SmoothingMode = System.Drawing.Drawing2D.SmoothingMode.HighQuality;
g.TextRenderingHint = System.Drawing.Text.TextRenderingHint.AntiAlias;

//フォントオブジェクトの作成
Font fnt = new Font("Arial", 25, FontStyle.Italic);
//StringFormatオブジェクトの作成
StringFormat sf = new StringFormat();

//幅の最大値が1000ピクセルとして、文字列を描画するときの大きさを計測する
SizeF stringSize = g.MeasureString(s, fnt, 1000, sf);
//取得した文字列の大きさを使って四角を描画する
g.DrawRectangle(Pens.Red, 0, 0, stringSize.Width, stringSize.Height);

//より正確に大きさを計測する
Rectangle rect = MeasureStringPrecisely(g, s, fnt, canvas.Size, sf);
g.DrawRectangle(Pens.Blue, rect.Left, rect.Top, rect.Width, rect.Height);

//文字列を描画する
g.DrawString(s, fnt, Brushes.Black, 0, 0, sf);

//リソースを解放する
fnt.Dispose();
sf.Dispose();
g.Dispose();

//PictureBox1に表示する
PictureBox1.Image = canvas;