注意:ここで紹介している方法は、.NET Framework 2.0以降でのみ使用できます。
注意:画像の表示方法が分からないという方は、まず「コントロールやフォームに画像を表示する」をご覧ください。
コントロールを描画する方法は「コントロールを描画する」で説明しましたが、ここではコントロールをvisualスタイルで描画する方法を紹介します。
「(コントロール名)Renderer」という名前のクラスを使うことで、コントロールをvisualスタイルで描画できます。このようなクラスを表にすると、以下のようになります。
| コントロール | 描画に使用するクラス | 補足 |
|---|---|---|
| Button | ButtonRendererクラス | RenderMatchingApplicationStateプロパティをTrueにすることにより、アプリケーションのvisualスタイルが無効な場合でもvisualスタイルで描画される |
| CheckBox | CheckBoxRendererクラス | RenderMatchingApplicationStateプロパティをTrueにすることにより、アプリケーションのvisualスタイルが無効な場合でもvisualスタイルで描画される |
| GroupBox | GroupBoxRendererクラス | RenderMatchingApplicationStateプロパティをTrueにすることにより、アプリケーションのvisualスタイルが無効な場合でもvisualスタイルで描画される |
| RadioButton | RadioButtonRendererクラス | RenderMatchingApplicationStateプロパティをTrueにすることにより、アプリケーションのvisualスタイルが無効な場合でもvisualスタイルで描画される |
| ComboBox | ComboBoxRendererクラス | visualスタイルが無効な場合に例外をスロー |
| ProgressBar | ProgressBarRendererクラス | visualスタイルが無効な場合に例外をスロー |
| ScrollBar | ScrollBarRendererクラス | visualスタイルが無効な場合に例外をスロー |
| Tab | TabRendererクラス | visualスタイルが無効な場合に例外をスロー |
| TextBox | TextBoxRendererクラス | visualスタイルが無効な場合に例外をスロー |
| TrackBar | TrackBarRendererクラス | visualスタイルが無効な場合に例外をスロー |
上の表で「visualスタイルが無効な場合に例外をスロー」と書かれているクラスは、visualスタイルが無効な場合(OSがサポートしていないか、ユーザーが無効にしているか、アプリケーションウィンドウのクライアント領域に適用されていない場合)に使用すると、例外InvalidOperationExceptionをスローします。「RenderMatchingApplicationStateプロパティをTrueにすることにより...」と書かれているクラスは、visualスタイルが無効な場合(前記条件に加え、現在のアプリケーションにvisualスタイルが適用されていない場合)に使用すると、クラシックスタイルで描画されます。さらにこれらのクラスのRenderMatchingApplicationStateプロパティをTrueにすると、visualスタイルが無効な場合でもvisualスタイルで描画されます。
visualスタイルが無効な場合に例外をスローするクラスでは、そのクラスのIsSupportedプロパティを使ってそのクラスが使用できるか確認できます。
補足:OSがvisualスタイルをサポートしているかを調べるには、VisualStyleInformation.IsSupportedByOSプロパティがTrueを返すか調べます。ユーザーがvisualスタイルを有効にしているかを調べるには、VisualStyleInformation.IsEnabledByUserプロパティがTrueを返すか調べます。アプリケーションウィンドウのクライアント領域にvisualスタイルが使用されているか調べるには、Application.VisualStyleStateプロパティにVisualStyleState.ClientAreaEnabledかVisualStyleState.ClientAndNonClientAreasEnabledが設定されているかを調べます。
これら3つがすべて有効かを調べるには、VisualStyleRenderer.IsSupportedプロパティがTrueを返すか調べます。
これら3つがすべて有効で、さらに現在のアプリケーションにvisualスタイルが適用されているか調べるには、Application.RenderWithVisualStylesプロパティがTrueを返すか調べます。
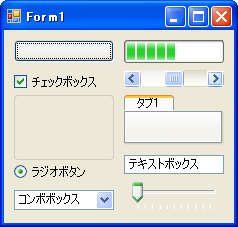
以下にこれらのクラスを使ってコントロールを描画する例を示します。ここでは、ピクチャボックスである"PictureBox1"に描画しています。
'Imports System.Drawing
'Imports System.Windows.Forms

'描画先とするImageオブジェクトを作成する
Dim canvas As New Bitmap(PictureBox1.Width, PictureBox1.Height)
'ImageオブジェクトのGraphicsオブジェクトを作成する
Dim g As Graphics = Graphics.FromImage(canvas)

'ボタンコントロールを描画する
Dim butonRect As New Rectangle(10, 10, 100, 22)
'背景を描画
ButtonRenderer.DrawParentBackground(g, butonRect, PictureBox1)
'フォーカスを描画し、普通の状態とする
ButtonRenderer.DrawButton(g, butonRect, PictureBox1.Text, PictureBox1.Font, _
    True, System.Windows.Forms.VisualStyles.PushButtonState.Normal)

'チェックボックスを描画する
'大きさと位置を計算
Dim checkBoxRect As New Rectangle(10, 40, 100, 24)
Dim checkBoxLocation As New Point(checkBoxRect.X, _
    checkBoxRect.Y + (checkBoxRect.Height - 13) / 2)
Dim checkBoxTextRect As New Rectangle(checkBoxRect.X + 16, checkBoxRect.Y, _
    checkBoxRect.Width - 16, checkBoxRect.Height)
'テキストの表示法
Dim checkBoxTextFormat As TextFormatFlags = _
    TextFormatFlags.Left Or TextFormatFlags.VerticalCenter
'チェックされた普通の状態とする
CheckBoxRenderer.DrawCheckBox(g, checkBoxLocation, checkBoxTextRect, _
    "チェックボックス", PictureBox1.Font, checkBoxTextFormat, False, _
    System.Windows.Forms.VisualStyles.CheckBoxState.CheckedNormal)

'グループボックスを描画する
GroupBoxRenderer.DrawGroupBox(g, New Rectangle(10, 65, 100, 65), _
    System.Windows.Forms.VisualStyles.GroupBoxState.Normal)

'ラジオボタンを描画する
'大きさと位置を計算
Dim radioButtonRect As New Rectangle(10, 130, 100, 24)
Dim radioButtonLocation As New Point(radioButtonRect.X, _
    radioButtonRect.Y + (radioButtonRect.Height - 13) / 2)
Dim radioButtonTextRect As New Rectangle(radioButtonRect.X + 16, _
    radioButtonRect.Y, radioButtonRect.Width - 16, radioButtonRect.Height)
'テキストの表示法
Dim radioButtonTextFormat As TextFormatFlags = _
    TextFormatFlags.Left Or TextFormatFlags.VerticalCenter
'チェックされた普通の状態とする
RadioButtonRenderer.DrawRadioButton(g, radioButtonLocation, _
    radioButtonTextRect, "ラジオボタン", PictureBox1.Font, _
    radioButtonTextFormat, False, _
    System.Windows.Forms.VisualStyles.RadioButtonState.CheckedNormal)

'コンボボックスを描画する
If ComboBoxRenderer.IsSupported Then
    '大きさと位置を計算
    Dim comboBoxRect As New Rectangle(10, 160, 100, 20)
    Dim comboBoxButtonRect As New Rectangle( _
        comboBoxRect.X + comboBoxRect.Width - 18, comboBoxRect.Y + 1, _
        17, comboBoxRect.Height - 2)
    'テキストの表示法
    Dim comboBoxTextFormat As TextFormatFlags = TextFormatFlags.TextBoxControl
    'テキストボックスの描画
    ComboBoxRenderer.DrawTextBox(g, comboBoxRect, "コンボボックス", _
        PictureBox1.Font, comboBoxTextFormat, _
        System.Windows.Forms.VisualStyles.ComboBoxState.Normal)
    'ドロップダウンボタンの描画
    ComboBoxRenderer.DrawDropDownButton(g, comboBoxButtonRect, _
        System.Windows.Forms.VisualStyles.ComboBoxState.Normal)
End If

'プログレスバーバーを描画する
If ProgressBarRenderer.IsSupported Then
    '大きさと位置を計算
    Dim progressBarRect As New Rectangle(120, 10, 100, 23)
    Dim progressBarChunksRect As New Rectangle(progressBarRect.X + 3, _
        progressBarRect.Y + 3, 50, progressBarRect.Height - 6)
    '空のプログレスバーバーを描画
    ProgressBarRenderer.DrawHorizontalBar(g, progressBarRect)
    'プログレスバーバーの中身を描画
    ProgressBarRenderer.DrawHorizontalChunks(g, progressBarChunksRect)
End If

'スクロールバーを描画する
If ScrollBarRenderer.IsSupported Then
    Dim scrollBarRect As New Rectangle(120, 40, 100, 17)
    'トラックの描画
    ScrollBarRenderer.DrawLeftHorizontalTrack(g, _
        New Rectangle(scrollBarRect.X, scrollBarRect.Y, 50, _
            scrollBarRect.Height), _
        System.Windows.Forms.VisualStyles.ScrollBarState.Normal)
    ScrollBarRenderer.DrawRightHorizontalTrack(g, _
        New Rectangle(scrollBarRect.X + 50, scrollBarRect.Y, _
            50, scrollBarRect.Height), _
        System.Windows.Forms.VisualStyles.ScrollBarState.Pressed)
    'つまみの描画
    ScrollBarRenderer.DrawHorizontalThumb(g, _
        New Rectangle(scrollBarRect.X + 40, scrollBarRect.Y, _
            20, scrollBarRect.Height), _
        System.Windows.Forms.VisualStyles.ScrollBarState.Normal)
    'つまみのグリップを描画
    ScrollBarRenderer.DrawHorizontalThumbGrip(g, _
        New Rectangle(scrollBarRect.X + 40, scrollBarRect.Y, _
            20, scrollBarRect.Height), _
        System.Windows.Forms.VisualStyles.ScrollBarState.Normal)
    '矢印ボタンの描画
    ScrollBarRenderer.DrawArrowButton(g, _
        New Rectangle(scrollBarRect.X, scrollBarRect.Y, _
            17, scrollBarRect.Height), _
        System.Windows.Forms.VisualStyles.ScrollBarArrowButtonState.LeftNormal)
    ScrollBarRenderer.DrawArrowButton(g, _
        New Rectangle(scrollBarRect.X + scrollBarRect.Width - 17, _
            scrollBarRect.Y, 17, scrollBarRect.Height), _
        System.Windows.Forms.VisualStyles.ScrollBarArrowButtonState.RightHot)
End If

'タブを描画する
If TabRenderer.IsSupported Then
    '大きさと位置を計算
    Dim tabRect As New Rectangle(120, 65, 100, 50)
    Dim tabItemRect As New Rectangle(tabRect.X, tabRect.Y, 50, 16)
    Dim tabPageRect As New Rectangle( _
        tabRect.X, tabRect.Y + tabItemRect.Height, tabRect.Width, _
        tabRect.Height - tabItemRect.Height)
    'タブページの描画
    TabRenderer.DrawTabPage(g, tabPageRect)
    'タブアイテムの描画
    TabRenderer.DrawTabItem(g, tabItemRect, "タブ1", PictureBox1.Font, False, _
        System.Windows.Forms.VisualStyles.TabItemState.Selected)
End If

'テキストボックスを描画する
If TextBoxRenderer.IsSupported Then
    Dim textBoxRect As New Rectangle(120, 125, 100, 19)
    Dim textBoxFormat As TextFormatFlags = TextFormatFlags.TextBoxControl
    TextBoxRenderer.DrawTextBox(g, textBoxRect, "テキストボックス", _
        PictureBox1.Font, textBoxFormat, _
        System.Windows.Forms.VisualStyles.TextBoxState.Normal)
End If

'トラックバーを描画する
If TrackBarRenderer.IsSupported Then
    '大きさと位置を計算
    Dim trackBarRect As New Rectangle(120, 150, 100, 5)
    Dim trackBarTrackRect As New Rectangle( _
        trackBarRect.X + 8, trackBarRect.Y + 10, trackBarRect.Width - 16, 4)
    Dim trackBarTicksRect As New Rectangle( _
        trackBarRect.X + 13, trackBarRect.Y + 25, trackBarRect.Width - 26, 4)
    Dim trackBarThumbRect As New Rectangle( _
        trackBarRect.X + 8, trackBarRect.Y + 2, 11, 21)
    'トラックの描画
    TrackBarRenderer.DrawHorizontalTrack(g, trackBarTrackRect)
    '目盛りの描画
    TrackBarRenderer.DrawHorizontalTicks(g, trackBarTicksRect, 11, _
        System.Windows.Forms.VisualStyles.EdgeStyle.Raised)
    'つまみの描画
    TrackBarRenderer.DrawBottomPointingThumb(g, trackBarThumbRect, _
        System.Windows.Forms.VisualStyles.TrackBarThumbState.Normal)
End If

g.Dispose()

'PictureBox1に表示する
PictureBox1.Image = canvas
//using System.Drawing;
//using System.Windows.Forms;

//描画先とするImageオブジェクトを作成する
Bitmap canvas = new Bitmap(PictureBox1.Width, PictureBox1.Height);
//ImageオブジェクトのGraphicsオブジェクトを作成する
Graphics g = Graphics.FromImage(canvas);

//ボタンコントロールを描画する
Rectangle butonRect = new Rectangle(10, 10, 100, 22);
//背景を描画
ButtonRenderer.DrawParentBackground(g, butonRect, PictureBox1);
//フォーカスを描画し、普通の状態とする
ButtonRenderer.DrawButton(g, butonRect,
    PictureBox1.Text, PictureBox1.Font, true,
    System.Windows.Forms.VisualStyles.PushButtonState.Normal);

//チェックボックスを描画する
//大きさと位置を計算
Rectangle checkBoxRect = new Rectangle(10, 40, 100, 24);
Point checkBoxLocation = new Point(checkBoxRect.X,
    checkBoxRect.Y + (checkBoxRect.Height - 13) / 2);
Rectangle checkBoxTextRect = new Rectangle(
    checkBoxRect.X + 16, checkBoxRect.Y,
    checkBoxRect.Width - 16, checkBoxRect.Height);
//テキストの表示法
TextFormatFlags checkBoxTextFormat = TextFormatFlags.Left |
    TextFormatFlags.VerticalCenter;
//チェックされた普通の状態とする
CheckBoxRenderer.DrawCheckBox(g,
    checkBoxLocation, checkBoxTextRect,
    "チェックボックス", PictureBox1.Font, checkBoxTextFormat, false,
    System.Windows.Forms.VisualStyles.CheckBoxState.CheckedNormal);

//グループボックスを描画する
GroupBoxRenderer.DrawGroupBox(g,
    new Rectangle(10, 65, 100, 65),
    System.Windows.Forms.VisualStyles.GroupBoxState.Normal);

//ラジオボタンを描画する
//大きさと位置を計算
Rectangle radioButtonRect = new Rectangle(10, 130, 100, 24);
Point radioButtonLocation = new Point(radioButtonRect.X,
    radioButtonRect.Y + (radioButtonRect.Height - 13) / 2);
Rectangle radioButtonTextRect = new Rectangle(
    radioButtonRect.X + 16, radioButtonRect.Y,
    radioButtonRect.Width - 16, radioButtonRect.Height);
//テキストの表示法
TextFormatFlags radioButtonTextFormat = TextFormatFlags.Left |
    TextFormatFlags.VerticalCenter;
//チェックされた普通の状態とする
RadioButtonRenderer.DrawRadioButton(g,
    radioButtonLocation, radioButtonTextRect,
    "ラジオボタン", PictureBox1.Font, radioButtonTextFormat, false,
    System.Windows.Forms.VisualStyles.RadioButtonState.CheckedNormal);

//コンボボックスを描画する
if (ComboBoxRenderer.IsSupported)
{
    //大きさと位置を計算
    Rectangle comboBoxRect = new Rectangle(10, 160, 100, 20);
    Rectangle comboBoxButtonRect = new Rectangle(
        comboBoxRect.X + comboBoxRect.Width - 18, comboBoxRect.Y + 1,
        17, comboBoxRect.Height - 2);
    //テキストの表示法
    TextFormatFlags comboBoxTextFormat = TextFormatFlags.TextBoxControl;
    //テキストボックスの描画
    ComboBoxRenderer.DrawTextBox(g, comboBoxRect,
        "コンボボックス", PictureBox1.Font, comboBoxTextFormat,
        System.Windows.Forms.VisualStyles.ComboBoxState.Normal);
    //ドロップダウンボタンの描画
    ComboBoxRenderer.DrawDropDownButton(g, comboBoxButtonRect,
        System.Windows.Forms.VisualStyles.ComboBoxState.Normal);
}

//プログレスバーバーを描画する
if (ProgressBarRenderer.IsSupported)
{
    //大きさと位置を計算
    Rectangle progressBarRect = new Rectangle(120, 10, 100, 23);
    Rectangle progressBarChunksRect = new Rectangle(
        progressBarRect.X + 3, progressBarRect.Y + 3,
        50, progressBarRect.Height - 6);
    //空のプログレスバーバーを描画
    ProgressBarRenderer.DrawHorizontalBar(g,
        progressBarRect);
    //プログレスバーバーの中身を描画
    ProgressBarRenderer.DrawHorizontalChunks(g,
        progressBarChunksRect);
}

//スクロールバーを描画する
if (ScrollBarRenderer.IsSupported)
{
    Rectangle scrollBarRect = new Rectangle(120, 40, 100, 17);
    //トラックの描画
    ScrollBarRenderer.DrawLeftHorizontalTrack(g,
        new Rectangle(scrollBarRect.X, scrollBarRect.Y,
            50, scrollBarRect.Height),
        System.Windows.Forms.VisualStyles.ScrollBarState.Normal);
    ScrollBarRenderer.DrawRightHorizontalTrack(g,
        new Rectangle(scrollBarRect.X + 50, scrollBarRect.Y,
            50, scrollBarRect.Height),
        System.Windows.Forms.VisualStyles.ScrollBarState.Pressed);
    //つまみの描画
    ScrollBarRenderer.DrawHorizontalThumb(g,
        new Rectangle(scrollBarRect.X + 40, scrollBarRect.Y,
            20, scrollBarRect.Height),
        System.Windows.Forms.VisualStyles.ScrollBarState.Normal);
    //つまみのグリップを描画
    ScrollBarRenderer.DrawHorizontalThumbGrip(g,
        new Rectangle(scrollBarRect.X + 40, scrollBarRect.Y,
            20, scrollBarRect.Height),
        System.Windows.Forms.VisualStyles.ScrollBarState.Normal);
    //矢印ボタンの描画
    ScrollBarRenderer.DrawArrowButton(g,
        new Rectangle(scrollBarRect.X, scrollBarRect.Y,
            17, scrollBarRect.Height),
        System.Windows.Forms.VisualStyles.ScrollBarArrowButtonState.LeftNormal);
    ScrollBarRenderer.DrawArrowButton(g,
        new Rectangle(scrollBarRect.X + scrollBarRect.Width - 17,
            scrollBarRect.Y, 17, scrollBarRect.Height),
        System.Windows.Forms.VisualStyles.ScrollBarArrowButtonState.RightHot);
}

//タブを描画する
if (TabRenderer.IsSupported)
{
    //大きさと位置を計算
    Rectangle tabRect = new Rectangle(120, 65, 100, 50);
    Rectangle tabItemRect = new Rectangle(tabRect.X, tabRect.Y, 50, 16);
    Rectangle tabPageRect = new Rectangle(
        tabRect.X, tabRect.Y + tabItemRect.Height,
        tabRect.Width, tabRect.Height - tabItemRect.Height);
    //タブページの描画
    TabRenderer.DrawTabPage(g, tabPageRect);
    //タブアイテムの描画
    TabRenderer.DrawTabItem(g, tabItemRect,
        "タブ1", PictureBox1.Font, false,
        System.Windows.Forms.VisualStyles.TabItemState.Selected);
}

//テキストボックスを描画する
if (TextBoxRenderer.IsSupported)
{
    Rectangle textBoxRect = new Rectangle(120, 125, 100, 19);
    TextFormatFlags textBoxFormat = TextFormatFlags.TextBoxControl;
    TextBoxRenderer.DrawTextBox(g, textBoxRect,
        "テキストボックス", PictureBox1.Font, textBoxFormat,
        System.Windows.Forms.VisualStyles.TextBoxState.Normal);
}

//トラックバーを描画する
if (TrackBarRenderer.IsSupported)
{
    //大きさと位置を計算
    Rectangle trackBarRect = new Rectangle(120, 150, 100, 5);
    Rectangle trackBarTrackRect = new Rectangle(
        trackBarRect.X + 8, trackBarRect.Y + 10,
        trackBarRect.Width - 16, 4);
    Rectangle trackBarTicksRect = new Rectangle(
        trackBarRect.X + 13, trackBarRect.Y + 25,
        trackBarRect.Width - 26, 4);
    Rectangle trackBarThumbRect = new Rectangle(
        trackBarRect.X + 8, trackBarRect.Y + 2,
        11, 21);
    //トラックの描画
    TrackBarRenderer.DrawHorizontalTrack(g, trackBarTrackRect);
    //目盛りの描画
    TrackBarRenderer.DrawHorizontalTicks(g, trackBarTicksRect, 11,
        System.Windows.Forms.VisualStyles.EdgeStyle.Raised);
    //つまみの描画
    TrackBarRenderer.DrawBottomPointingThumb(g, trackBarThumbRect,
        System.Windows.Forms.VisualStyles.TrackBarThumbState.Normal);
}

g.Dispose();

//PictureBox1に表示する
PictureBox1.Image = canvas;
上記のコードをWindows XPで実行すると、次のように表示されます。
今まで紹介したクラスは、visualスタイルでコントロールを描画する時、内部でVisualStyleRendererクラスを使用しています。かなり難易度は上がりますが、VisualStyleRendererクラスを直接使用すれば、上記の方法で描画できないコントロールや、コントロールの部分、状態も描画できます。
VisualStyleRendererクラスを使うには、まずどのコントロールのどの部品をどの状態で描画するか(どの要素を描画するか)を表すVisualStyleElementオブジェクトを取得して、それをVisualStyleRendererコンストラクタに渡します。VisualStyleElementクラスはたくさんの静的プロパティを持っており、これを使ってVisualStyleElementオブジェクトを取得することができます。例えば、スピンボタン(アップダウンコントロール)の上ボタンを押された状態で描画するならば、「VisualStyleElement.Spin.Up.Pressed」という静的プロパティで取得できるVisualStyleElementオブジェクトを使用します。
しかしVisualStyleElementクラスの静的プロパティとして用意されている要素はごく一部で、それ以外にも多くの要素を描画できます。そのような要素を描画したい場合は、VisualStyleRendererコンストラクタのもう一つのオーバーロードを使用します。こちらのコンストラクタには、描画するコントロールを表すクラス名(String型)、部品を表す値(Int32型)、状態を表す値(Int32型)の3つを渡します。この3つの値は、「Parts and States (Windows)」などで探すことができます。実際の値は、「Vsstyle.h」と「Vssym32.h」ファイルに記述されています。
補足:VisualStyleElement.CreateElementメソッドを使えば、これら3つの値からVisualStyleElementオブジェクトを作成することができます。
ただし、このように指定した要素が現在のvisualスタイルで定義されていない可能性もあります。そのような場合は、例外ArgumentExceptionがスローされます。ある要素が現在のvisualスタイルで定義されているか調べるには、VisualStyleRenderer.IsElementDefinedメソッドを使います。
このようにして指定した要素を実際に描画するには、VisualStyleRenderer.DrawBackgroundメソッドを呼び出します。
すでに存在しているVisualStyleRendererオブジェクトを使って別の要素を描画したい時は、VisualStyleRenderer.SetParametersメソッドで要素を変更することができます。SetParametersメソッドの使い方は、VisualStyleRendererコンストラクタと同じです。
VisualStyleRendererクラスを使って色々な要素を描画する例を以下に示します。
'Imports System.Drawing
'Imports System.Windows.Forms
'Imports System.Windows.Forms.VisualStyles

'描画先とするImageオブジェクトを作成する
Dim canvas As New Bitmap(PictureBox1.Width, PictureBox1.Height)
'ImageオブジェクトのGraphicsオブジェクトを作成する
Dim g As Graphics = Graphics.FromImage(canvas)

'VisualStyleRendererオブジェクトを作成する
'押された状態のボタンを描画する
Dim vsr As New VisualStyleRenderer( _
    VisualStyleElement.Button.PushButton.Pressed)
vsr.DrawBackground(g, New Rectangle(10, 10, 90, 20))

'無効状態のウィンドウの[閉じる]ボタンを描画する
vsr.SetParameters(VisualStyleElement.Window.CloseButton.Disabled)
vsr.DrawBackground(g, New Rectangle(10, 40, 20, 20))

'[開始]メニューのログオフボタンを描画する
vsr.SetParameters(VisualStyleElement.StartPanel.LogOffButtons.Normal)
vsr.DrawBackground(g, New Rectangle(10, 70, 80, 40))

'エクスプローラバーの[自動的に隠す]ボタンを描画する
vsr.SetParameters(VisualStyleElement.ExplorerBar.HeaderPin.Normal)
vsr.DrawBackground(g, New Rectangle(110, 10, 20, 20))

'DatePickerのDP_SHOWCALENDARBUTTONRIGHTをDPSCBR_NORMALで描画する
vsr.SetParameters("DATEPICKER", 3, 1)
vsr.DrawBackground(g, New Rectangle(110, 40, 30, 30))

'DragDropのDD_COPYをDDCOPY_HIGHLIGHTで描画する
Dim elem As VisualStyleElement = _
    VisualStyleElement.CreateElement("DRAGDROP", 1, 1)
vsr.SetParameters(elem)
vsr.DrawBackground(g, New Rectangle(110, 80, 30, 30))

g.Dispose()

'PictureBox1に表示する
PictureBox1.Image = canvas
//using System.Drawing;
//using System.Windows.Forms;
//using System.Windows.Forms.VisualStyles;

//描画先とするImageオブジェクトを作成する
Bitmap canvas = new Bitmap(PictureBox1.Width, PictureBox1.Height);
//ImageオブジェクトのGraphicsオブジェクトを作成する
Graphics g = Graphics.FromImage(canvas);

//VisualStyleRendererオブジェクトを作成する
//押された状態のボタンを描画する
VisualStyleRenderer vsr =
    new VisualStyleRenderer(
        VisualStyleElement.Button.PushButton.Pressed);
vsr.DrawBackground(g, new Rectangle(10, 10, 90, 20));

//無効状態のウィンドウの[閉じる]ボタンを描画する
vsr.SetParameters(VisualStyleElement.Window.CloseButton.Disabled);
vsr.DrawBackground(g, new Rectangle(10, 40, 20, 20));

//[開始]メニューのログオフボタンを描画する
vsr.SetParameters(VisualStyleElement.StartPanel.LogOffButtons.Normal);
vsr.DrawBackground(g, new Rectangle(10, 70, 80, 40));

//エクスプローラバーの[自動的に隠す]ボタンを描画する
vsr.SetParameters(VisualStyleElement.ExplorerBar.HeaderPin.Normal);
vsr.DrawBackground(g, new Rectangle(110, 10, 20, 20));

//DatePickerのDP_SHOWCALENDARBUTTONRIGHTをDPSCBR_NORMALで描画する
vsr.SetParameters("DATEPICKER", 3, 1);
vsr.DrawBackground(g, new Rectangle(110, 40, 30, 30));

//DragDropのDD_COPYをDDCOPY_HIGHLIGHTで描画する
VisualStyleElement elem =
    VisualStyleElement.CreateElement("DRAGDROP", 1, 1);
vsr.SetParameters(elem);
vsr.DrawBackground(g, new Rectangle(110, 80, 30, 30));

g.Dispose();

//PictureBox1に表示する
PictureBox1.Image = canvas;
