すでにある画像を1bpp(1ビット/ピクセル)の画像に変換する時問題となるのは、どのように1bppのBitmapオブジェクトを作成するかという点と、どのように2値化するかという点です。
1bppのBitmapオブジェクトは、BitmapクラスのコンストラクタにPixelFormat.Format1bppIndexedを指定することで作成できます。しかし、1bppのBitmapからはGraphics.FromImageメソッドでGraphicsオブジェクトを作成することができませんし、SetPixelメソッドを使うこともできません。そのため、1bppのBitmapに色を付けるには、Bitmap.LockBitsメソッドを使ってピクセルデータを直接書き換える必要があります。Bitmap.LockBitsメソッドの使い方は、「画像のカラーバランスを補正して表示する」で説明しています。
画像を2値化する最も簡単な方法は、ピクセルの色の明るさが設定したしきい値を越えれば白くし、越えなければ黒くするという方法(固定閾値法)でしょう。なお色の明るさは、Color.GetBrightnessメソッドで取得できます。
以下に具体例を示します。このCreate1bppImageメソッドを使うと、指定された画像を1bppイメージに変換できます。この例では、PictureBoxコントロール(PictureBox1)をクリックすると画像(C:\test\1.png)を1bppイメージに変換して、PictureBox1に表示しています。
なおこのコードを書くに当たり、「Convert RGB to 1bpp monochrome」と「Save a 32-bit Bitmap as 1-bit .bmp file in C#」を参考にさせていただきました。
'Imports System.Drawing
'Imports System.Drawing.Imaging

''' <summary>
''' 指定された画像から1bppのイメージを作成する
''' </summary>
''' <param name="img">基になる画像</param>
''' <returns>1bppに変換されたイメージ</returns>
Public Shared Function Create1bppImage(ByVal img As Bitmap) As Bitmap
    '1bppイメージを作成する
    Dim newImg As New Bitmap(img.Width, img.Height, _
                             PixelFormat.Format1bppIndexed)

    'Bitmapをロックする
    Dim bmpDate As BitmapData = newImg.LockBits( _
        New Rectangle(0, 0, newImg.Width, newImg.Height), _
        ImageLockMode.WriteOnly, newImg.PixelFormat)

    '新しい画像のピクセルデータを作成する
    Dim pixels As Byte() = New Byte(bmpDate.Stride * bmpDate.Height - 1) {}
    For y As Integer = 0 To bmpDate.Height - 1
        For x As Integer = 0 To bmpDate.Width - 1
            '明るさが0.5以上の時は白くする
            If 0.5F <= img.GetPixel(x, y).GetBrightness() Then
                'ピクセルデータの位置
                Dim pos As Integer = (x >> 3) + bmpDate.Stride * y
                '白くする
                pixels(pos) = pixels(pos) Or CByte(&H80 >> (x And &H7))
            End If
        Next
    Next
    '作成したピクセルデータをコピーする
    Dim ptr As IntPtr = bmpDate.Scan0
    System.Runtime.InteropServices.Marshal.Copy(pixels, 0, ptr, pixels.Length)

    'ロックを解除する
    newImg.UnlockBits(bmpDate)

    Return newImg
End Function

'PictureBox1のClickイベントハンドラ
Private Sub PictureBox1_Click(ByVal sender As Object, ByVal e As EventArgs) _
        Handles PictureBox1.Click
    '1bppにする画像
    Dim img As New Bitmap("C:\test\1.png")
    '1bppの画像を作成する
    Dim newImg As Image = Create1bppImage(img)
    img.Dispose()
    'PictureBox1に表示
    If Not PictureBox1.Image Is Nothing Then
        PictureBox1.Image.Dispose()
    End If
    PictureBox1.Image = newImg
End Sub
//using System.Drawing;
//using System.Drawing.Imaging;

/// <summary>
/// 指定された画像から1bppのイメージを作成する
/// </summary>
/// <param name="img">基になる画像</param>
/// <returns>1bppに変換されたイメージ</returns>
public static Bitmap Create1bppImage(Bitmap img)
{
    //1bppイメージを作成する
    Bitmap newImg = new Bitmap(img.Width, img.Height,
        PixelFormat.Format1bppIndexed);

    //Bitmapをロックする
    BitmapData bmpDate = newImg.LockBits(
        new Rectangle(0, 0, newImg.Width, newImg.Height),
        ImageLockMode.WriteOnly, newImg.PixelFormat);

    //新しい画像のピクセルデータを作成する
    byte[] pixels = new byte[bmpDate.Stride * bmpDate.Height];
    for (int y = 0; y < bmpDate.Height; y++)
    {
        for (int x = 0; x < bmpDate.Width; x++)
        {
            //明るさが0.5以上の時は白くする
            if (0.5f <= img.GetPixel(x, y).GetBrightness())
            {
                //ピクセルデータの位置
                int pos = (x >> 3) + bmpDate.Stride * y;
                //白くする
                pixels[pos] |= (byte)(0x80 >> (x & 0x7));
            }
        }
    }
    //作成したピクセルデータをコピーする
    IntPtr ptr = bmpDate.Scan0;
    System.Runtime.InteropServices.Marshal.Copy(pixels, 0, ptr, pixels.Length);

    ////アンセーフコードを使うと、以下のようにもできる
    //unsafe
    //{
    //    byte* pixelPtr = (byte*)bmpDate.Scan0;
    //    for (int y = 0; y < bmpDate.Height; y++)
    //    {
    //        for (int x = 0; x < bmpDate.Width; x++)
    //        {
    //            //明るさが0.5以上の時は白くする
    //            if (0.5f <= img.GetPixel(x, y).GetBrightness())
    //            {
    //                //ピクセルデータの位置
    //                int pos = (x >> 3) + bmpDate.Stride * y;
    //                //白くする
    //                pixelPtr[pos] |= (byte)(0x80 >> (x & 0x7));
    //            }
    //        }
    //    }
    //}

    //ロックを解除する
    newImg.UnlockBits(bmpDate);

    return newImg;
}

//PictureBox1のClickイベントハンドラ
private void PictureBox1_Click(object sender, EventArgs e)
{
    //1bppにする画像
    Bitmap img = new Bitmap(@"C:\test\1.png");
    //1bppの画像を作成する
    Image newImg = Create1bppImage(img);
    img.Dispose();
    //PictureBox1に表示
    if (PictureBox1.Image != null)
    {
        PictureBox1.Image.Dispose();
    }
    PictureBox1.Image = newImg;
}
補足:上の例では元の画像の色を取得するのにGetPixelメソッドを使っていますが、元の画像のデータもLockBitsメソッドで取得した方がパフォーマンスは向上するでしょう。
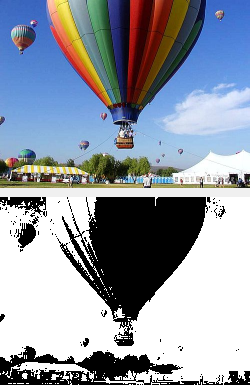
結果は、次のようになります。上が元の画像で、下が1bppにした画像です。
この例ではしきい値を0.5で固定していますが、これでは、極端に言えば、画像によっては真っ白、あるいは真っ黒になってしまう恐れがあります。よって、画像によってしきい値を変更した方が良い結果が得られます。適切なしきい値を計算する方法としては、判別分析法(大津の二値化)などがあります。興味のある方は、調べてみてください。
補足:1bppイメージを作成するのでなければ、ImageAttributes.SetThresholdメソッドを使ってしきい値を設定する方法も考えられます。この方法で画像を2値化するには、まず「画像をグレースケールに変換して表示する」のように画像をグレースケールにしてから、SetThresholdメソッドでしきい値をセットしたImageAttributesオブジェクトを使って画像を描画します(この方法は、「ガンマ補正をして画像を表示する」を参考にしてください)。
上記のようにしきい値で黒と白を決める方法では、黒い箇所と白い箇所が両極端になってしまい、その中間が表現されません。これを解決する方法として、ディザリング(Dithering)があります。その一つが、ランダム(無作為)ディザリング(Random dithering)です。この方法は、しきい値をランダムな数値にするというだけです。
例を示すまでもないとは思いますが、念の為に載せておきます。
'Imports System.Drawing
'Imports System.Drawing.Imaging

''' <summary>
''' ランダムディザリングを使用して、
''' 指定された画像から1bppのイメージを作成する
''' </summary>
''' <param name="img">基になる画像</param>
''' <returns>1bppに変換されたイメージ</returns>
Public Shared Function Create1bppImageWithRandomDithering( _
        ByVal img As Bitmap) As Bitmap
    '乱数を生成するために、Randomオブジェクトを作成する
    Dim rnd As New Random()

    '1bppイメージを作成する
    Dim newImg As New Bitmap(img.Width, img.Height, _
                             PixelFormat.Format1bppIndexed)

    'Bitmapをロックする
    Dim bmpDate As BitmapData = newImg.LockBits( _
        New Rectangle(0, 0, newImg.Width, newImg.Height), _
        ImageLockMode.WriteOnly, newImg.PixelFormat)

    '新しい画像のピクセルデータを作成する
    Dim pixels As Byte() = New Byte(bmpDate.Stride * bmpDate.Height - 1) {}
    For y As Integer = 0 To bmpDate.Height - 1
        For x As Integer = 0 To bmpDate.Width - 1
            '明るさがランダムな数値以上の時は白くする
            If rnd.NextDouble() <= img.GetPixel(x, y).GetBrightness() Then
                'ピクセルデータの位置
                Dim pos As Integer = (x >> 3) + bmpDate.Stride * y
                '白くする
                pixels(pos) = pixels(pos) Or CByte(&H80 >> (x And &H7))
            End If
        Next
    Next
    '作成したピクセルデータをコピーする
    Dim ptr As IntPtr = bmpDate.Scan0
    System.Runtime.InteropServices.Marshal.Copy(pixels, 0, ptr, pixels.Length)

    'ロックを解除する
    newImg.UnlockBits(bmpDate)

    Return newImg
End Function
//using System.Drawing;
//using System.Drawing.Imaging;

/// <summary>
/// ランダムディザリングを使用して、
/// 指定された画像から1bppのイメージを作成する
/// </summary>
/// <param name="img">基になる画像</param>
/// <returns>1bppに変換されたイメージ</returns>
public static Bitmap Create1bppImageWithRandomDithering(Bitmap img)
{
    //乱数を生成するために、Randomオブジェクトを作成する
    Random rnd = new Random();

    //1bppイメージを作成する
    Bitmap newImg = new Bitmap(img.Width, img.Height,
        PixelFormat.Format1bppIndexed);

    //Bitmapをロックする
    BitmapData bmpDate = newImg.LockBits(
        new Rectangle(0, 0, newImg.Width, newImg.Height),
        ImageLockMode.WriteOnly, newImg.PixelFormat);

    //新しい画像のピクセルデータを作成する
    byte[] pixels = new byte[bmpDate.Stride * bmpDate.Height];
    for (int y = 0; y < bmpDate.Height; y++)
    {
        for (int x = 0; x < bmpDate.Width; x++)
        {
            //明るさがランダムな数値以上の時は白くする
            if (rnd.NextDouble() <= img.GetPixel(x, y).GetBrightness())
            {
                //ピクセルデータの位置
                int pos = (x >> 3) + bmpDate.Stride * y;
                //白くする
                pixels[pos] |= (byte)(0x80 >> (x & 0x7));
            }
        }
    }
    //作成したピクセルデータをコピーする
    IntPtr ptr = bmpDate.Scan0;
    System.Runtime.InteropServices.Marshal.Copy(pixels, 0, ptr, pixels.Length);

    //ロックを解除する
    newImg.UnlockBits(bmpDate);

    return newImg;
}
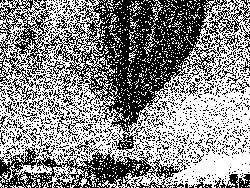
結果は、例えば以下のようになります。
オーダード(配列)ディザリング(Ordered dithering)と呼ばれる方法では、例えば8x8の行列(マップ)を作っておき、画像のピクセルに対応する行列の要素をしきい値とすることで2値化します。言葉では説明が難しいので、詳細は「ディザリング(パターン・ディザ)」などを参考にしてください。
以下の例では、4x4の行列を使用してオーダードディザリングを行なっています。オーダードディザリングで使われる典型的な行列については、「Libcaca study - 2. Halftoning」(文字の色と背景色が同じため、文字が見えにくくなっています)が参考になります。
'Imports System.Drawing
'Imports System.Drawing.Imaging

''' <summary>
''' 配列ディザリングを使用して、
''' 指定された画像から1bppのイメージを作成する
''' </summary>
''' <param name="img">基になる画像</param>
''' <returns>1bppに変換されたイメージ</returns>
Public Shared Function Create1bppImageWithOrderedDithering( _
        ByVal img As Bitmap) As Bitmap
    'しきい値マップを作成する
    Dim thresholdMap As Single()() = New Single(3)() _
        {New Single(3) _
            {1.0F / 17.0F, 9.0F / 17.0F, 3.0F / 17.0F, 11.0F / 17.0F}, _
         New Single(3) _
            {13.0F / 17.0F, 5.0F / 17.0F, 15.0F / 17.0F, 7.0F / 17.0F}, _
         New Single(3) _
            {4.0F / 17.0F, 12.0F / 17.0F, 2.0F / 17.0F, 10.0F / 17.0F}, _
         New Single(3) _
            {16.0F / 17.0F, 8.0F / 17.0F, 14.0F / 17.0F, 6.0F / 17.0F}}

    '1bppイメージを作成する
    Dim newImg As New Bitmap(img.Width, img.Height, _
                             PixelFormat.Format1bppIndexed)

    'Bitmapをロックする
    Dim bmpDate As BitmapData = newImg.LockBits( _
        New Rectangle(0, 0, newImg.Width, newImg.Height), _
        ImageLockMode.WriteOnly, newImg.PixelFormat)

    '新しい画像のピクセルデータを作成する
    Dim pixels As Byte() = New Byte(bmpDate.Stride * bmpDate.Height - 1) {}
    For y As Integer = 0 To bmpDate.Height - 1
        For x As Integer = 0 To bmpDate.Width - 1
            'しきい値マップの値と比較する
            If thresholdMap(x Mod 4)(y Mod 4) <= _
                    img.GetPixel(x, y).GetBrightness() Then
                'ピクセルデータの位置
                Dim pos As Integer = (x >> 3) + bmpDate.Stride * y
                '白くする
                pixels(pos) = pixels(pos) Or CByte(&H80 >> (x And &H7))
            End If
        Next
    Next
    '作成したピクセルデータをコピーする
    Dim ptr As IntPtr = bmpDate.Scan0
    System.Runtime.InteropServices.Marshal.Copy(pixels, 0, ptr, pixels.Length)

    'ロックを解除する
    newImg.UnlockBits(bmpDate)

    Return newImg
End Function
//using System.Drawing;
//using System.Drawing.Imaging;

/// <summary>
/// 配列ディザリングを使用して、
/// 指定された画像から1bppのイメージを作成する
/// </summary>
/// <param name="img">基になる画像</param>
/// <returns>1bppに変換されたイメージ</returns>
public static Bitmap Create1bppImageWithOrderedDithering(Bitmap img)
{
    //しきい値マップを作成する
    float[][] thresholdMap = new float[4][]
    {
        new float[4] {1f/17f, 9f/17f, 3f/17f, 11f/17f},
        new float[4] {13f/17f, 5f/17f, 15f/17f, 7f/17f},
        new float[4] {4f/17f, 12f/17f, 2f/17f, 10f/17f},
        new float[4] {16f/17f, 8f/17f, 14f/17f, 6f/17f}
    };

    //1bppイメージを作成する
    Bitmap newImg = new Bitmap(img.Width, img.Height,
        PixelFormat.Format1bppIndexed);

    //Bitmapをロックする
    BitmapData bmpDate = newImg.LockBits(
        new Rectangle(0, 0, newImg.Width, newImg.Height),
        ImageLockMode.WriteOnly, newImg.PixelFormat);

    //新しい画像のピクセルデータを作成する
    byte[] pixels = new byte[bmpDate.Stride * bmpDate.Height];
    for (int y = 0; y < bmpDate.Height; y++)
    {
        for (int x = 0; x < bmpDate.Width; x++)
        {
            //しきい値マップの値と比較する
            if (thresholdMap[x % 4][y % 4] <=
                img.GetPixel(x, y).GetBrightness())
            {
                //ピクセルデータの位置
                int pos = (x >> 3) + bmpDate.Stride * y;
                //白くする
                pixels[pos] |= (byte)(0x80 >> (x & 0x7));
            }
        }
    }
    //作成したピクセルデータをコピーする
    IntPtr ptr = bmpDate.Scan0;
    System.Runtime.InteropServices.Marshal.Copy(pixels, 0, ptr, pixels.Length);

    //ロックを解除する
    newImg.UnlockBits(bmpDate);

    return newImg;
}
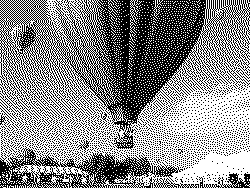
結果は、次のようになります。

最後に誤差拡散法(Error-diffusion dithering)を紹介します。この方法は、あるピクセルを別の色に変換した時、変換前の色と変換後の色の差(誤差)を周りのピクセルに振り分けます。どのように周りに振り分けるかには、「Floyd-Steinberg dithering」や「Jarvis, Judice, and Ninke (JaJuNi) dithering」、「Bill Atkinson dithering」などの方法があります。
以下に、Floyd-Steinberg ditheringを使った例を示します。なお別の振り分け方については、「Libcaca study - 3. Error diffusion」が参考になります。
'Imports System.Drawing
'Imports System.Drawing.Imaging

''' <summary>
''' 誤差拡散法(Floyd-Steinbergディザリング)を使用して、
''' 指定された画像から1bppのイメージを作成する
''' </summary>
''' <param name="img">基になる画像</param>
''' <returns>1bppに変換されたイメージ</returns>
Public Shared Function Create1bppImageWithErrorDiffusion( _
        ByVal img As Bitmap) As Bitmap
    '1bppイメージを作成する
    Dim newImg As New Bitmap(img.Width, img.Height, _
                             PixelFormat.Format1bppIndexed)

    'Bitmapをロックする
    Dim bmpDate As BitmapData = newImg.LockBits( _
        New Rectangle(0, 0, newImg.Width, newImg.Height), _
        ImageLockMode.[WriteOnly], newImg.PixelFormat)

    '現在の行と次の行の誤差を記憶する配列
    Dim errors As Single()() = New Single(1)() _
        {New Single(bmpDate.Width) {}, _
         New Single(bmpDate.Width) {}}

    '新しい画像のピクセルデータを作成する
    Dim pixels As Byte() = New Byte(bmpDate.Stride * bmpDate.Height - 1) {}
    For y As Integer = 0 To bmpDate.Height - 1
        For x As Integer = 0 To bmpDate.Width - 1
            'ピクセルの明るさに、誤差を加える
            Dim err As Single = _
                img.GetPixel(x, y).GetBrightness() + errors(0)(x)
            '明るさが0.5以上の時は白くする
            If 0.5F <= err Then
                'ピクセルデータの位置
                Dim pos As Integer = (x >> 3) + bmpDate.Stride * y
                '白くする
                pixels(pos) = pixels(pos) Or CByte(&H80 >> (x And &H7))
                '誤差を計算(黒くした時の誤差はerr-0なので、そのまま)
                err -= 1.0F
            End If

            '誤差を振り分ける
            errors(0)(x + 1) += err * 7.0F / 16.0F
            If x > 0 Then
                errors(1)(x - 1) += err * 3.0F / 16.0F
            End If
            errors(1)(x) += err * 5.0F / 16.0F
            errors(1)(x + 1) += err * 1.0F / 16.0F
        Next
        '誤差を記憶した配列を入れ替える
        errors(0) = errors(1)
        errors(1) = New Single(errors(0).Length - 1) {}
    Next
    '作成したピクセルデータをコピーする
    Dim ptr As IntPtr = bmpDate.Scan0
    System.Runtime.InteropServices.Marshal.Copy(pixels, 0, ptr, pixels.Length)

    'ロックを解除する
    newImg.UnlockBits(bmpDate)

    Return newImg
End Function
//using System.Drawing;
//using System.Drawing.Imaging;

/// <summary>
/// 誤差拡散法(Floyd-Steinbergディザリング)を使用して、
/// 指定された画像から1bppのイメージを作成する
/// </summary>
/// <param name="img">基になる画像</param>
/// <returns>1bppに変換されたイメージ</returns>
public static Bitmap Create1bppImageWithErrorDiffusion(Bitmap img)
{
    //1bppイメージを作成する
    Bitmap newImg = new Bitmap(img.Width, img.Height,
        PixelFormat.Format1bppIndexed);

    //Bitmapをロックする
    BitmapData bmpDate = newImg.LockBits(
        new Rectangle(0, 0, newImg.Width, newImg.Height),
        ImageLockMode.WriteOnly, newImg.PixelFormat);

    //現在の行と次の行の誤差を記憶する配列
    float[][] errors = new float[2][] {
        new float[bmpDate.Width + 1],
        new float[bmpDate.Width + 1]
    };

    //新しい画像のピクセルデータを作成する
    byte[] pixels = new byte[bmpDate.Stride * bmpDate.Height];
    for (int y = 0; y < bmpDate.Height; y++)
    {
        for (int x = 0; x < bmpDate.Width; x++)
        {
            //ピクセルの明るさに、誤差を加える
            float err = img.GetPixel(x, y).GetBrightness() + errors[0][x];
            //明るさが0.5以上の時は白くする
            if (0.5f <= err)
            {
                //ピクセルデータの位置
                int pos = (x >> 3) + bmpDate.Stride * y;
                //白くする
                pixels[pos] |= (byte)(0x80 >> (x & 0x7));
                //誤差を計算(黒くした時の誤差はerr-0なので、そのまま)
                err -= 1f;
            }

            //誤差を振り分ける
            errors[0][x + 1] += err * 7f / 16f;
            if (x > 0)
            {
                errors[1][x - 1] += err * 3f / 16f;
            }
            errors[1][x] += err * 5f / 16f;
            errors[1][x + 1] += err * 1f / 16f;
        }
        //誤差を記憶した配列を入れ替える
        errors[0] = errors[1];
        errors[1] = new float[errors[0].Length];
    }
    //作成したピクセルデータをコピーする
    IntPtr ptr = bmpDate.Scan0;
    System.Runtime.InteropServices.Marshal.Copy(pixels, 0, ptr, pixels.Length);

    //ロックを解除する
    newImg.UnlockBits(bmpDate);

    return newImg;
}
結果は、次のようになります。
注意:この記事では、基本的な事柄の説明が省略されているかもしれません。初心者の方は、特に以下の点にご注意ください。